Imposition

Imposition applies to a multipage PDF we want to prepare for the layout of a book / booklet.
According with the parameters we input, PDF will be replicated for the number of pages it contains (or a subset we have selected).
Each duplicate, comprised the original one, will be set to represent a convenient page, page that will be moved and, in case, rotated at a place determined by our choices in the imposition dialog.

Fig. 1 - 16 pages imposition
Foreword
Since the 2.5 version FitPlot introduces the concept of pagination (see here).
A FitPlot document is no more limited to one page only, corresponding to the area it represents.
Now document area extends indefinitely toward the right and the bottom and can be encapsulated into a grid of "cells" (horizontal x vertical pages) each one corresponding to the current page setup.
About pagination and imposition you just have to know that the print formats will be positioned in 2 columns: the left column will contain the booklet "recto" pages, the right column the "verso" pages.
According to the number of booklet pages and to its subdivision in pages per format, the algorithm will calculate how many (vertical) formats it will need.
As we will see in the following, we can have until 16 pages per format, so it's up to us to predetermine the format size.
Let's start
- Insert the PDF to impose.
- Think about how many pages of the final booklet size can found place in a single printer sheet. According to this, set the sheet size (page setup or quick page size). In case resize the PDF. Do not rotate the PDF!.
- With PDF selected, choose menu File -> Imposition… (or the relative tool
 in the toolbar). If the menu is grayed, then the PDF is not a PDF or it has one page only or you have selected nothing.
- After selecting the imposition command, a dialog should appear, according with the last time it was used, in one of two configurations visible in fig. 2A and 2B.
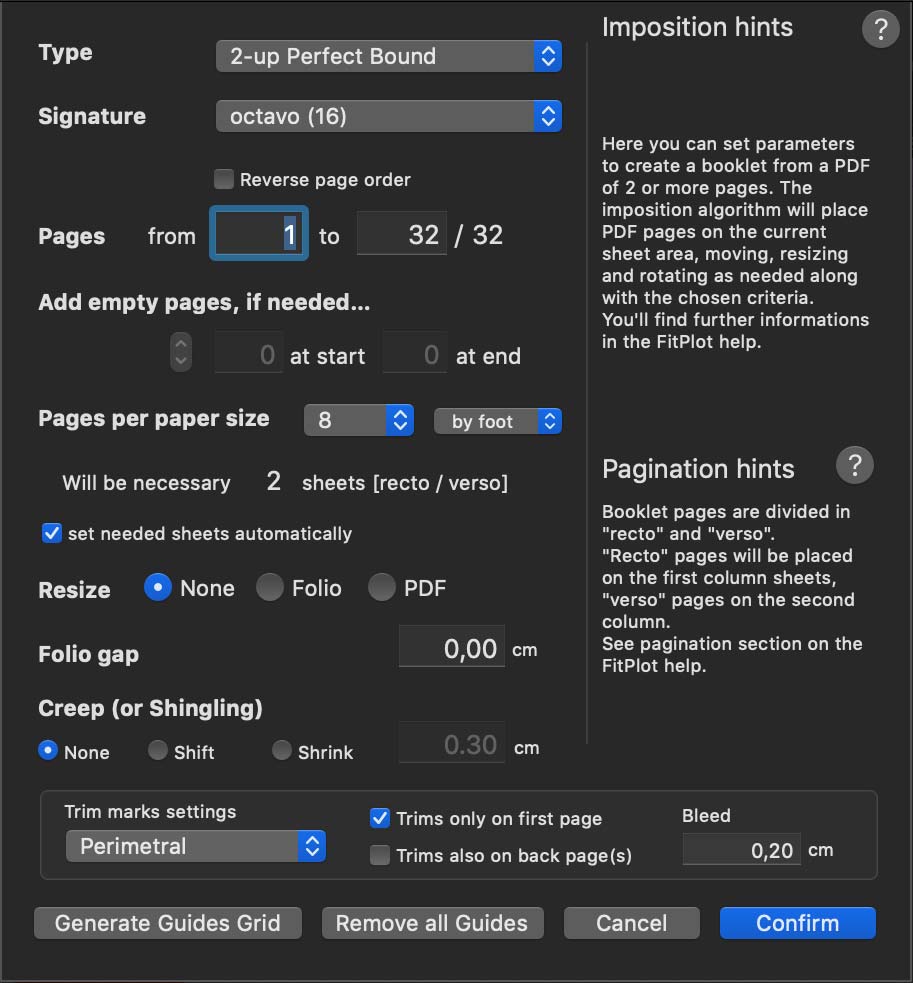
Fig. 2A - 2up perfect bound
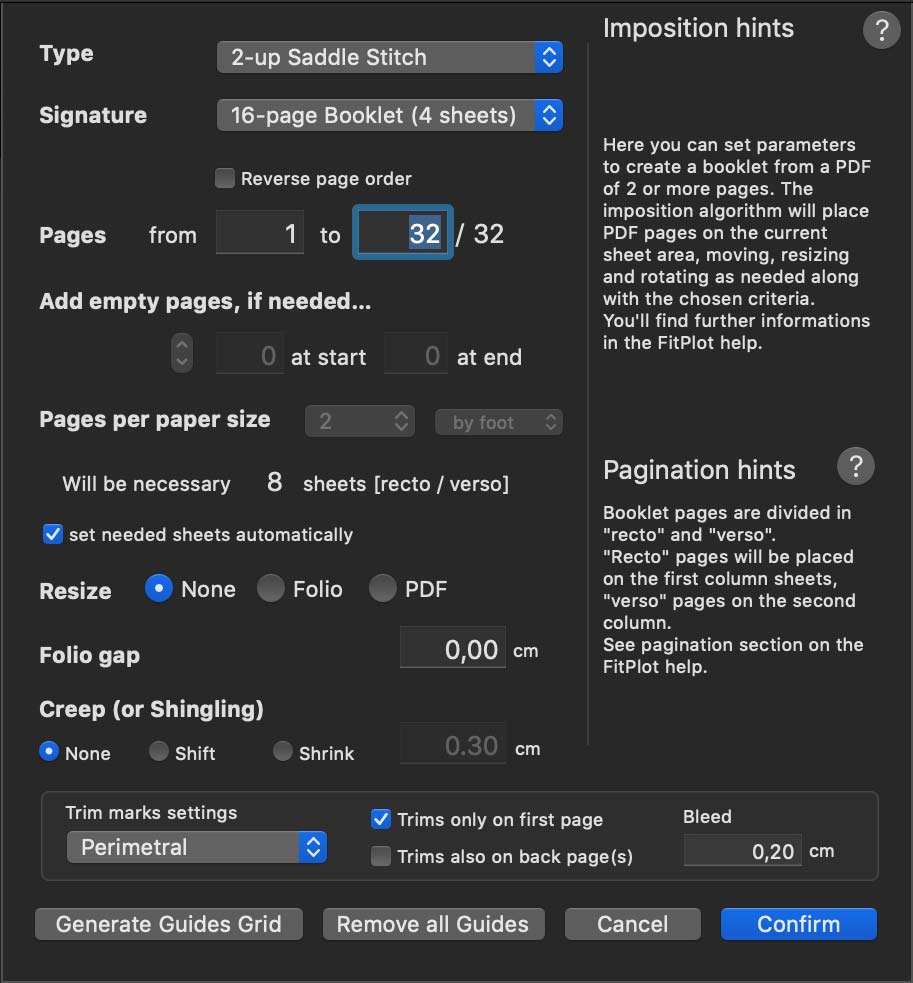
Fig. 2B - 2up saddle stitch
Possible configurations
Type
Two types of binding are currently available:
- 2-up Saddle Stitch (fig. 2A)
- 2-up Perfect bound (fig. 2B)
2-Up Perfect bound
Pages are printed on the printer sheet according to a pattern such that, after folding the sheet as in fig. 3, we get the right page order.
Along with the number of pages in a single sheet, we have a different signature (see signatures later), hence a different number of foldings to do.
In fig. 1 we have seen an octavo signature that contains 16 pages (8 recto + 8 verso) that needs 3 foldings.
Once folded, signature has to be trimmed to "free" tied pages, hence it may be needed to leave a margin of safety for this operation (see folio gap later).
Total pages have to be a multiple of the chosen signature (see signatures later), hence, if they are not enough, blank places will be left (see adding lacking pages).
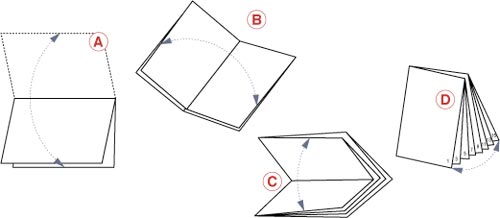
Fig. 3 - 2-Up Perfect bound
Signature (2-Up Perfect Bound)
- folio (4)
- quarto (8)
- octavo (16)
- sextodecimo (32)
This popup is contextual, it changes accordingly with the type of imposition chosen. The list above is showed when the imposition type is the "2Up Perfect Bound".
Pages will be framed according with the chosen signature.
The bracketed number indicate how many pages (or multiples) are possible with that kind of signature.
For example folio is made of a sheet folded in two, obtaining 4 sides (pages).
Folding again, we have the quarto (see fig. 3) obtaining 8 pages. Folding again we obtain the other possible signatures.
Book sizes [taken from Wikipedia]
The size of a modern book is based on the printing area of a common flatbed press.
The pages of type were arranged and clamped in a frame, so that when printed on a sheet of paper the full size of the press, the pages would be right side up and in order when the sheet was folded (see fig. 3), and the folded edges trimmed.
The most common book sizes are:
- Folio: up to 15" (ca 38 cm) tall.
- Quarto: (4to): the sheet of paper is folded twice, forming four leaves (eight pages) approximately 11-13 inches (ca 30 cm) tall.
- Octavo: (8vo): the most common size for current hardcover books. The sheet is folded three times into eight leaves (16 pages) up to 9 ¾" (ca 23 cm) tall.
- Sextodecimo: (16mo): the sheet is folded four times, forming sixteen leaves (32 pages) up to 6 ¾" (ca 15 cm) tall
2-Up Saddle Stitch
If our output device has a small page size and the maximum pages per format is 2, then the 2-up saddle stitch is more suitable.
The booklet is composed of folio (4 pages per sheet), see fig. 4.
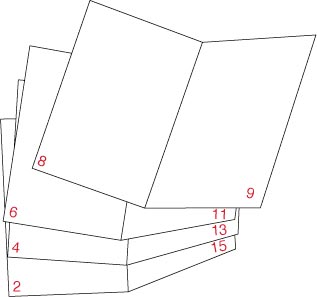
Fig. 4 - 2-Up Saddle Stitch
Total pages have to be a multiple of 4, so lacking pages will be added (see add lacking pages later).
When the pages are many, it is better to group them in booklets with a limited number of pages, in order to easily bend and stitch.
In this case, the Signature popup, lets you choice between the options below:
Signature (2-Up Saddle Stitch)
- Single booklet (all pages)
- 4-page Booklet (1 sheet)
- 8-page Booklet (2 sheets)
- 12-page Booklet (3 sheets)
- 16-page Booklet (4 sheets)
- 20-page Booklet (5 sheets)
- 24-page Booklet (6 sheets)
- 28-page Booklet (7 sheets)
- 32-page Booklet (8 sheets)
Options go from the 4-pages booklet to the 32-pages booklet (with step 4), you can, however, use the single booklet (with all the pages).
In the 2-Up Saddle Stitch, only in the case of the single booklet, you can choose to have 2, 4, 8 or 16 pages per format. In such cases total pages will be a multiple of 4, 8, 16 or 32 respectively and lacking pages will be added, as just above said.
In each other signature obtion of the 2-Up Saddle Stitch (subdivision in booklets), pages per format are fixed (2). Only the folio format (4 pages per sheet, 2 front and 2 back) is admitted.
Some empty pages may be generated (see add blank pages below), whenever they will be necessary to complete the booklet.
These pages can be placed (partly or totally) at the beginning (of the first booklet) or at the ending (of the last booklet), acting on the relative input fields.
Tip: For example, I have 60 pages and I want them divided in two 32-pages booklets (32+32=64 pages total), so I'll have 4 empty pages that may be placed at the begin, at the end or 2 at begin and 2 at the end and so on.
Tip: A quick way to print a booklet with a desktop A4 printer is the following:
- Use the A4 as a folio (4 pages). The booklet final size will be A5.
- Choose 2-up saddle stitch imposition.
- Wait FitPlot to make the imposition then print only the first column of generated pages using the print odd pages only in the print dialog option.
- Reposition the just printed sheets in the printer paper tray in order to print on the blank side.
- From the print dialog options, this time choose even pages only et voila!
Note: if you print on a duplex printer just send your pages sequentially (from 1 to last). Your printer driver will do the job to sort front and backs for you. If this doesn't happen, read instructions on your device manual.
Pages range
Here we can choose a subset of the total PDF to impose.
Add blank pages
If needed, blank pages will be added (that is empty spaces will be left at "blank pages" place) to complete the signature or the "pages per format" quantity.
Tip: For example, to print in a "Sextodecimo (32)" a PDF that has only 30 pages, the 2 lacking pages have to be generated, hence 2 blank spaces will be left in place of the 2 lacking pages.
We can decide where to put these blank pages (how many at the beginning, how many at the end).
Note: Keep in mind that left pages are always even numbers and the right ones are odd numbers!
Pages per sheet
According to available printer page sizes and to final booklet dimension, we can decide how many pages could fill one print sheet.
It is important to establish this value before to make the imposition.
Note: If we decide to change the page size after the imposition, pages will be misplaced, so it will be necessary to start over with a new imposition. Simply delete all generated images leaving only one that has not been rotated then restart the imposition with the new page size. Learn more....
Pages arrangement (by foot / by head)
When the signature requires pages to be arranged in two rows (4, 8 or 16 pages per sheet), you can choose to rotate pages in a same column in way to touch head with head or foot with foot. See figures below.
By foot

By head
Some bookbinders prefers to work one way, for others it is indifferent.
Needed sheets
This value indicates how many sheets will be needed for the pagination settings (see pagination) with the current configuration.
Resize
Here you can set how the program automatically acts to fit the signatures into each sheet of paper:
- None: does nothing, it's up to you to set up the correct page size to host the entire signature. The page size has to be calculated before entering this dialog. You should use this way if your printer paper size is big enough to contain the 4, 8 or more pages of a signature.
- Folio: in this case, the page size (folio) will be automatically resized in order to contain 4, 8 or more pages of a signature. It may happen that the page size exceeds limits imposed in the printer margin setting, in this case a warning dialog will appear.
- PDF: with this third option the program will resize PDF pages to well fit in the current page size.
Folio gap
In the imposition process pages are grouped in folio (2 adjacent pages, see Fig. 5).
Setting a distance between folios can ease trim operations.
Typed value is in the current unit of measure, as indicated in the dialog.
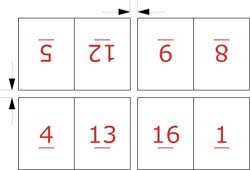
Fig. 5 - Folio gap
Creep
The creep value correct the shifting we have inserting inner folios into the outer folio.
This is due to the page thickness (see fig. 6).
Currently you have two options to compensate the creep:
- Shift
Pages will be opportunely shifted of a value from zero (inner folio) to the typed value (outer folio), proportionally to their order in the assembling stack.
- Shrink
Pages will be opportunely stretched on the X axis from zero (inner folio) to the needed amount calculated on the typed value (outer folio), proportionally to their order in the assembling stack.
Typed value is in the current unit of measure, as indicated in the dialog.
To know exactly the value of the creep, build up a real sample, folding the needed amount* of sheets of the same paper you are going to use.
Measure the creep value as indicated in fig. 6.
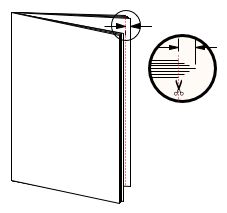
Fig. 6 - Creep
[*The amount of sheets you have to fold for the sample is calculated for the 2 Up Stitched dividing the total pages by 4, for the 2 Up Perfect Bound, dividing the signature value (the bracketed number, 32, 16, 8 or 4) by 4.]
Reverse page order
When this option is checked, the order of the pages is reversed.
In some languages the binding is on the right side of the book and to successfully print a book you will have to create your imposition in reverse order.
Trim (crop) marks options
With these controls it is possible to manage the printing of crop marks, useful for pages trimming.
There are many options: trim marks may be printed perimetrally, only on the first sheet, also on back pages.
Trims offset is determined by the bleed value (see next).
Bleed
Bleed is the edge of a page which is going to be cut off. If it is necessary for the print to cover the printed matter all the way to the final edge, the printed design must continue over the further trim. This is necessary to avoid having a white border on some pages which can happen due to printing and trimming inaccuracies.
The "bleed", if any, requires a value > 0 (usually from 2 to 5mm max) and this value is assumed to be present on each side of all pages of the multipage PDF used for the imposition.
This same bleed value is used to print crop marks (see above).
Push buttons for gudes creation / removing
These push buttons have been added as a convenience to easily create a grid of magnetic guides on the sheet area.
Magnetic guides are useful for any displacement / modify after imposition.
The use of this buttons is very easy:
- Choose the kind of imposition and set all the parameters needed.
- Click "Remove all Guides" button to clear and avoid overlap with old guides
- Click "Generate Guides Grid" button to create the guides for the current parameters
- Confirm and perform
In the end we will have the imposed pages surrounded by a series of guides (horizontal and vertical) to snap.
And after?
Once confirmed, it may take some time to duplicate and rearrange all pages.
At the end you'll see the pages in the current sheet. To see (and print) the other pages that are in the other sheets, if you have not enabled the automatic setting needed sheet (see above), activate the pagination dialog from the File->Pagination or from the pagination command ![]() in the toolbar, (see fig. 7).
in the toolbar, (see fig. 7).
Fig. 7 - Pagination dialog
In the pagination dialog set the horizontal pages value to 2 and the vertical value to the amount of PDF pages divided by the number of pages per format, divided again by 2 (because we have already 2 in the horizontal value).
Note: Overlap values has to be zero.
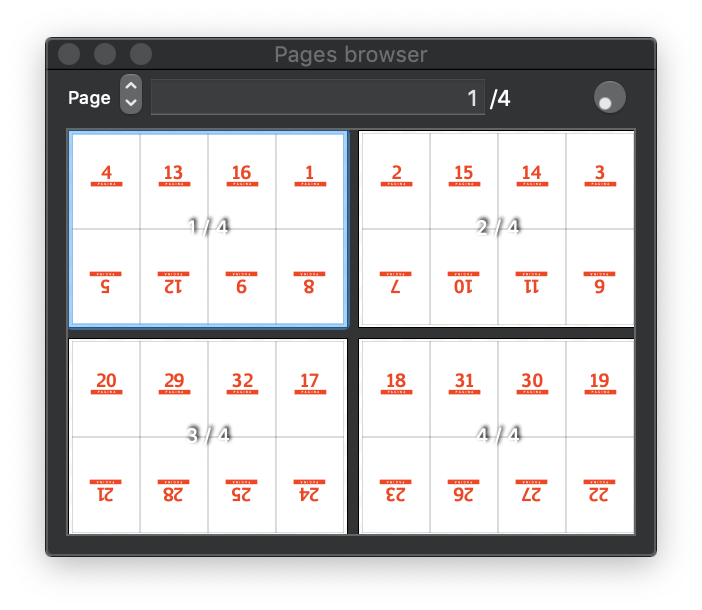
Now you can open the pages browser clicking the ![]() button at the top right of the main FitPlot window (see fig. 8).
button at the top right of the main FitPlot window (see fig. 8).
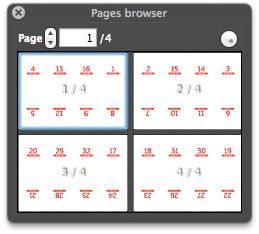
Fig. 8 - Pages browser
In the Pages Browser you should see in the first column the "recto" pages and in the second the "verso" pages.
Now it's easy to proceed with the print, using the "print odd pages only" option in the print dialog, then repositioning the just printed sheets in the printer paper tray in order to print on the blank side.
Then, choose File->Print again and in the print dialog options, this time choose even pages only.
At the end you should have a print recto/verso of your booklet. Last thing left is to fold, trim and stitch.
Doing it again:
If you need to restart over the imposition, execute the necessary "Undo" [cmd-U], and you should return to the initial state.
If this wont happen, you can reset it by hand, deleting all the generated PDFs but one. Only if needed, reset rotation, scale, page number of the remained one, then select it and repeat the imposition with the new settings.
There is a practical video demonstration about this from the FitPlot YouTube channel here below:
This and other video lessons are available on FitPlot YouTube Channel