Tracking your print jobs

Since the 2.7 version FitPlot is able to produce a log) reporting a record for each print job sent by itself.
 Since FitPlot 4.7, a log browser has been implemented directly inside the program starting from the View menu, or [cmd-shift L] shortcut.
Users with previous versions may download the dedicated app FitPlotLog that has been developed to read / modify these log files.
Log files
With the 4.5 version we started to take advantage of this data to count paper consumption inside FitPlot.
This fact makes possible, for example, to know if there is enough paper in that plotter roll just before to print the current document.
Let's see how to set up all to work:
Let's activate the printer panel, if it is not yet visible, from menu View -> Show / Hide Printers Panel or with the keys combination [cmd-alt-P].
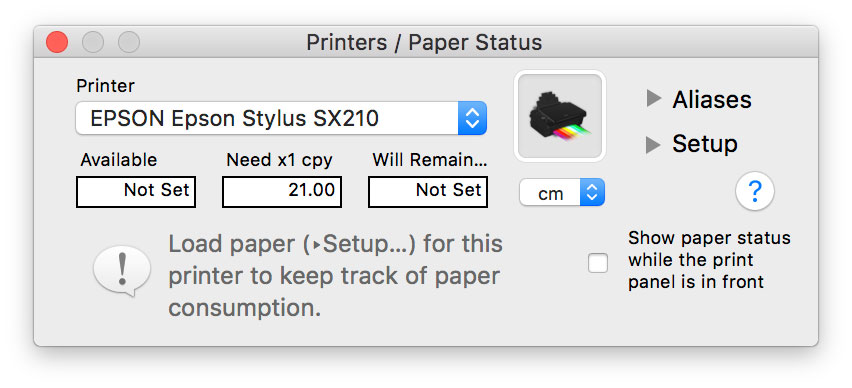
The following panel will show up:
Clicking on the printer popup, we choose the printer we are interested in.
Note: the printer monitoring makes sense if we think to a plotter that has, generally, a roll of determined width and length as paper supply. It makes less sense in case of single sheet printers.
The basic concept is counting the consumption scaling each print job performed from the initial supply (charged roll).
Here are all the elements in the panel:
- Choose printer popup: here we select the printer to check in the available printer's list
- Selected printer's icon
- Available: shows the remaining paper quantity
- Needed: shows the needed quantity to print one copy of the current document
- Remaining: shows the calculated difference between available and needed quantities
- Unit of measure: popup to set the unit of measure for all represented values in this same panel
- Message: dynamic warning message based on involved quantities
- Notify: this checkbox has to be checked if and only if we do intend to be warned in case of paper leak.
When notify is checked, the program performs a control upon printer dialog confirm and, whenever the algorithm discovers that there is no sufficient paper supply, this same panel, if hidden, shows up with informations tied to the values you are setting in the print panel. A beep will sound in case of paper shortage.
Tip: if you do not want to use the paper warning feature, just leave printers notify checkbox unchecked (this is, of course, the program default).
- Help: clicking this, brings up this same page.
- Alias: when more Mac users uses FitPlot to print on the same plotter, it is mandatory that the log files are the same for all users. The alias push button let us to insert alias names for the printers we have to control. In fact, a shared printer may be recognized with a different name by client users. The printer name is visible in the Mac System Preferences panel, printer's section.
So each user should register all the printer names recognized by other users in its alias fields (only if he wants to check that printer and if the name differs from its printer's name).
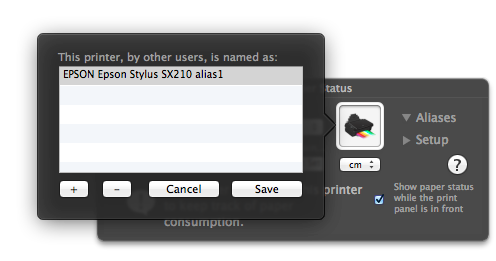
Let's see a practical example:
Paolo sees the plotter HP500PS with the name "designJet500PS", while Niccolò recognizes the same plotter with the name "designJet500PS@Mac Paolo".
So Paolo will add the alias "designJet500PS@Mac Paolo" and Niccolò will have to make the same with "designJet500PS" to get recorded data consistent.
For a better understanding, see log files structures. - Setup: in order to get a plotter / printer monitored, it is not sufficient to click on the notify checkbox only.
It is necessary also a first paper load, to make a start point for the calculation.
Clicking on setup arrow the underlaying part of the panel is showed. here we can fill the fields needed when a new paper charge is doing.
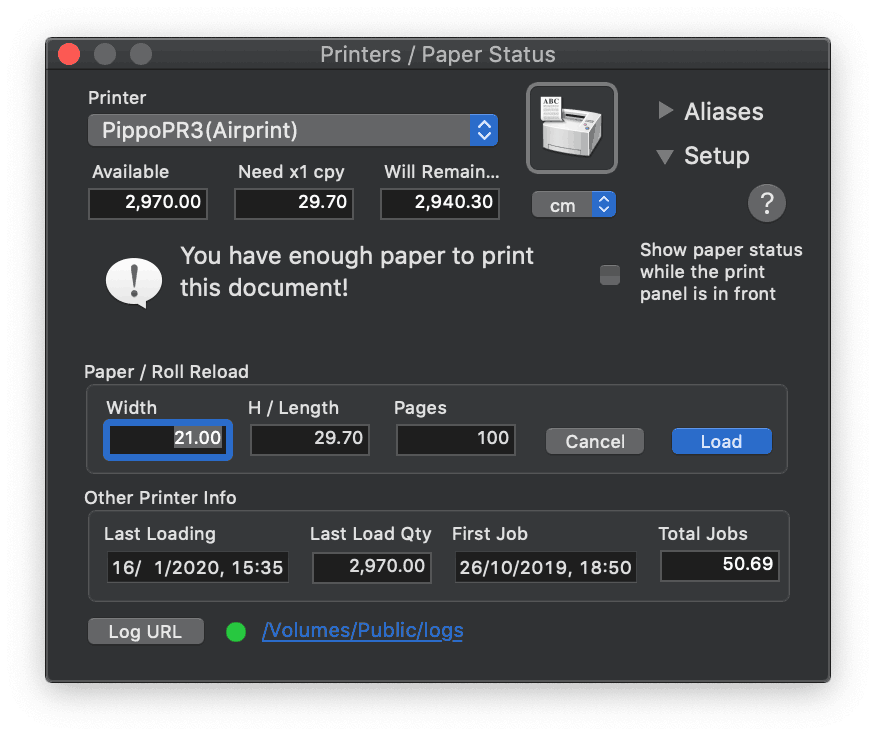
- Width: type here the value of the roll width (or the single sheet width), using the current unit of measure of the panel.
- Height: type here, in case of a plotter roll, the whole length either, in single sheet printers case, the height of the sheet.
- Pages: type 1 in case of roll charging, type the number of sheets in case of single sheets charging.
- Once you entered the right data in each field, the "Load" push button lets you insert the record in the database log so you are able to count down the charged value at each print job.
- In the below line there are other interesting read only informations, such as date and quantity of the last reload, date of the first recorded print job, total length of print jobs performed, always referring tu the currently popup chosen printer.
- Log URL push button.
Here we set the folder where print jobs data are recorded. In the case of more users sharing the same printer devices we want to track, we'll choose a local folder accessible to all users (a network disk).
The warning light (next to the Log URL push button) testify the state of the connection with the log file. Moving the mouse on the warning light, a text message will show up the current connection state.
Three states are available:
● Custom Log URL not set yet. Default log URL will be used:…
See below how to use shared log files when you want to monitor a shared printer.
● Saved log URL currently NOT reachable at:….Default log URL will be temporarily used!
● Saved log URL IS up and running at:… - One last thing, to close the setup section without perform the paper recharge, just click on the "cancel" button or on the Setup arrow again.
Using shared log files
In the case a same plotter is used by more than just one FitPlot user it is mandatory to record all the print jobs in log files that reside in a folder shared and visible to all users.
The Log URL push button we have seen in the last part of the panel description has this purpose. Clicking on it you can browse and choose / create a folder where other users do have access and, other users, by their sides, would have to choose the same folder as destination of their data print jobs performed.
Important notes about using shared log folder
It may happen that the shared disk, where you decided to store the log folder, would momentary be unavailable. In such cases, when starting FitPlot, an alert shows up warning that the chosen log directory is not available and therefore the default log folder will be used.
Of course we are able, when the shared disk is newly available, to select again the remote log folder, from the Printers Panel [cmd-alt-P].
Our jobs recorded in the temporary log folder, will be merged with the records in the shared folder.
Of course, again, while temporarily using the default log folder, you and other FitPlot users cannot rely on the overall paper consumption without taking account of the records in the shared log folder momentarily unavailable.
Since vers. 7.2.0.
If the log file is temporarily unreachable, the problem is reported.
In the meanwhile data are recorded locally (on a temporary Log file).
As soon as the network become available again, recorded data are transferred and merged with the original Log file.
No need to newly select the original Log folder, this is done transparently!
Log files
Print job records are saved in two files:
- jobsLogDB.plist
- imgsLogDB.plist
The jobsLogDB.plist file records the following parameters:
- id number
- printer name
- page size width
- page size height
- unit of measure
- date and time
- # copies
- # pages
- FitPlot document name*
- percentage of images occupation on the page
- print job user
- ICD [ink coverage density]
[*] Whenever you print a not saved document ("Untitled"), in case it contains one image only, the name of that image will be assigned in the document name field of the log record. If instead the untitled document contains more images, a dialog will prompt, while printing, to input the name to assign to the document name field.
Each row of this file represents a print job performed and record the main characteristics of the printed document.
Since a FitPlot document may contain more than jus one image, the second file, imgsLogDB.plist , will record a row for each image in the printed document.
You can see in the following that each record has an id number that is related to the id number in jobsLogDB.plist, in this way it is easy to see wich images are assigned to a print job.
The imgsLogDB.plist file records the following parameters:
- id number
- image file name
- image size (width)
- image size (height)
- # of image reproductions
Note: Since FitPlot 4.5 log files are saved as "property lists" (.plist), while previous versions saved data as text.
Log files are produced by default and resides in the user library, inside the folder pointing at this path: /~Library/Application Support/com.pamarcu.fitPlot/Logs/ unless you set to save them in a shared folder (see Using shared log files).
Log Browser
Starting from FitPlot 4.7 you can browse log files directly inside FitPlot with the advantage to have all the parameters of a print job just a click far from inside FitPlot. More over a new field, the ICD [ink coverage density], has been added to give a ink consumption parameter in the print job costs calculations, see this topic for further informations.
The new panel (named Log Browser) is accessible by the View menu [cmd-shift L] or by the toolbar equivalent button ![]() and is showed below:
and is showed below:
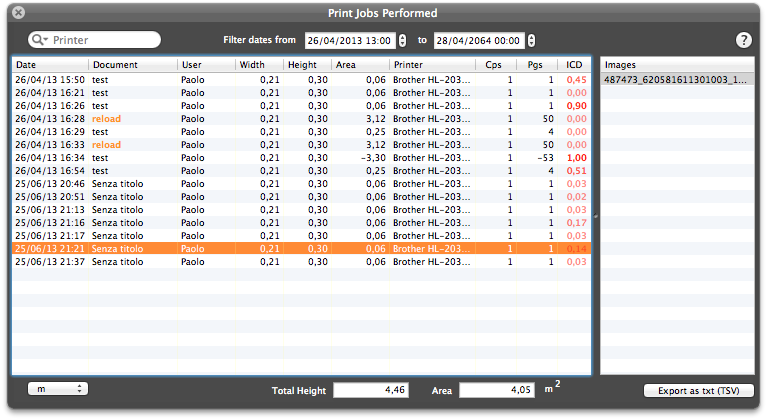
Currently you can browse all jobs performed and the modifies are limited to the following:
- it is not possible to edit single fields (except for document name and images names)
- it is not possible to add records
- it is possible to remove records (one at a time, selecting the row to delete and pressing the backspace key)
- it is possible to search / filter by printer, document or user names
- it is possible to filter records by a range of dates
- it is possible to change the unit of measure
- it is possible to export records (filtered by search or by dates) in a text file (as Tab Separated Values, for an easy import in a database or in a spreadsheet)
That's all for now. I'll be happy to consider suggestions to improve this from experts on the field. Just send me an e mail.
Note: FitPlot 4.5 users can still use the here below FitPlotLog standalone app, that is available for free download at the link at the end of this page.
FitPlotLog (standalone app)
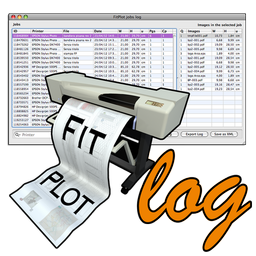
A simple application, FitPlotLog, let you browse your pasted printing jobs.
- Double click on a line (record) to edit each field.
- Use push buttons ⊕ and ⊖ to add / remove lines.
- Use the search field to filter records.
- Check the paper length and and area consumption.
- Click the ⟳ refresh button to update calculated values.
- Save edited log or export it as Tab Separated text for using in a spreadsheet or a database.
Here's the single window screenshot:
The jobs table (left) shows the print jobs performed. The images table (on the right), shows which images were included in the currently selected job.

DISCLAIMER OF WARRANTY:
The author has made no express warranties, oral or written, to you regarding FitPlotLog.
FitPlotLog is being provided to you 'as is' without warranty of any kind.
The author shall not be liable for direct or indirect damages resulting from the use of FitPlotLog. You use this program solely at your own risk.
ATTENTION: with FitPlot until version 4.2 (included) use FitPlotLog 1.
Download FitPlotLog 1 (448 Kb)ATTENTION: starting with FitPlot version 4.5 use FitPlotLog 2.
Download FitPlotLog 2 (464 Kb)