Templates Organization
To be ready for every need is an essential part in productivity.
So, a well organized FitPlot environment may help you very much in this, let's know how:
based on your printer devices, you can set up, for any printer, your preferred (most used) templates.
For whom would not know, templates are FitPlot documents that have commonly used settings and that opens as "Untitled" documents.
These templates may be accessed imediately from the File menu, just follow these simple rules when creating them:
- Start FitPlot, choose new document from the file menu.
- Go to the page setup menu, select printer, dimensions ant orientation, then click Ok.
- Now you have a FitPlot document of the given size (for the given printer). You can complete the template setting printer margins (Tool menu) essential for correct automatic resizing in nesting algorithm, and finally placing images, logos etc. you want to be present when opening from this template.
- Now choose Menu->Save as Template…, you will be bringed directly in the Templates folder.
- Click on the New Folder button if you need a new printer folder.
- Finally give the document a self-explaining name (such as A4, A3, 32"x42" etc.).
- Do the same for other printers / sizes and you'll have the File -> New From Model… menu populated with your items.
If you have organized your FitPlot templates in the templates folder then you should be able to see all your files divided by folder (printer) and file name, as in the showed snapshot.

Other settings…
You can get the best from your templates setting some preferences (that are saved with the template itself) like for example:
- how to pack the images in the available space
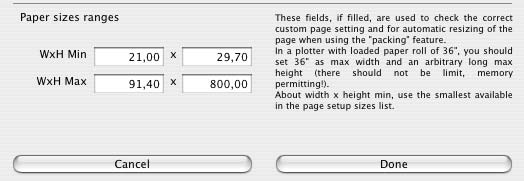
- the paper ranges max and min for each printer
For example: an Epson Stylus has a fixed page size, while an HP designJet 500 has a variable page size (roll), so it is better to set some preferences in the appropriate way, see table / margin settings dialog and nesting preferences dialog here below.
Further explainations at Printer margin settings and at nesting topics:
Margin settings table
| Page format | Suggested nesting | Paper ranges max and min |
| Fixed (desktop printer) | Add new pages | Leave all fields empty |
| Variable (plotter roll) | Expand / shrink print area | Set max roll width and about 8 meters length (or even more) |
Other preferences that are not "general" and are saved along with the document are: units, display settings, page settings, window size, panels on/off.
Import settings
It is possible to change the format of the current document with a simple click (menu File->Import Settings from…) getting settings from one of the saved templates (in the templates folder) or from an existing FitPlot file.
In this way, for example, it is easy to change the current document size from an A2 to an A1, it is enough to have a previously organized template folder, populated with our preferred sizes or, alternatively, to have an A1 FitPlot document saved on the disk.
This feature it is very useful when using the print to FitPlot from another application, see PDF workflow.
It may happen that a PDF inserted in this way find itself in a inappropriate page size.
So we can easily choose to import settings from the right template or file, avoiding the passage from the page setup dialog, avoiding to change page ranges (margins dialog) and nesting preset (preferences dialog), see the above paragraph.
All the templates settings (or the FitPlot file) are then copied into the current document, changing its characteristics.