The preferences panel
The program saves its state every time you quit it, so the next time you start it, you will find the same settings you left.
This comprehends units, display settings, page settings, window size, info panel presence.
These same settings are saved with every file you save.
There are some more general preferences that you can save and will be common to all documents and they are showed in the preference panel.
From FitPlot 2.6 the panel has been logically rearranged in tabs, also because more options has arrived in 2.6 and more have to come in future version, so a re-organization has been needed.
Environment preferences
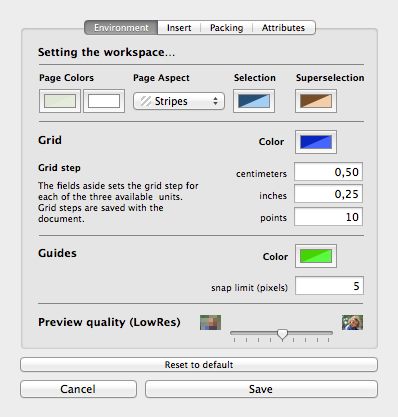
Page, grid, guides and selections colors: use the color picker to set color FitPlot uses to show the page background [see note], the grid color, selection and super selection rings and guides color. The non white background may be useful because in images with white borders (with grid not visible) can be difficult to see the real image bounds on a white background.
Note: background colours do not affect printing at all.
The Page Aspect popup let you choose between three kinds of background patterns:
 Solid
Solid
 Checkers
 Stripes
The colors are controlled by two selectors [Page Colors] that allows two distinct choices for stripes and checkers.
The "Solid" background color is chosen by the first color selector only.
Grid step: configurable for the three units available. You can decide to have a grid of 0.125 " or 2 cm or whatever you want. The grid step is saved as general preference (for new documents) and even with the document data (a saved document retains these settings).
Guides snap limit: this value establish the distance where magnetic guides have effect on objects sides snapping.
Image's screen quality setting:

This slider allows the image's resolution setting when in editing mode, to speed up the redrawing. To see images in high quality to your screen, switch the above toolbar button to "high". When printing, images resolution used is always the best available for each image.
Note that even when high quality is set, while editing (moving or clipping), low quality image is shown.
Pasteboard behavior preferences (outdated since v. 3.5)
This panel has been overcome by the new version 3.5. Now images copied from other programs (or via Drag&Drop from browsers) are always saved (in a temporary directory).
If you decide to save the document with such images, you'll be requested to save them, where you decide, using a prefix (so that the images will be named with your prefix plus a progressive number).
If you choose not to save, quitting the document will free the temporary images folder.
This has been necessary to give all images the possibility to use the new images adjust feature.
A side effect of this new behavior is that pasting images from a vectorial program, will preserve its "vectoriality", saving it as a PDF, with all advantages (resizing with no loss of quality).
Use of symbolic link.
Another problem with linked images was uprising when, after a document was saved, the linked images were moved to another place. Reopening that document, the file not found logo showed up in place of the no more found image. This has been solved with the automatic use of alias, so an image imported in a FitPlot document should be always trackable, even if moved some other place on the same disk.
Insert preferences
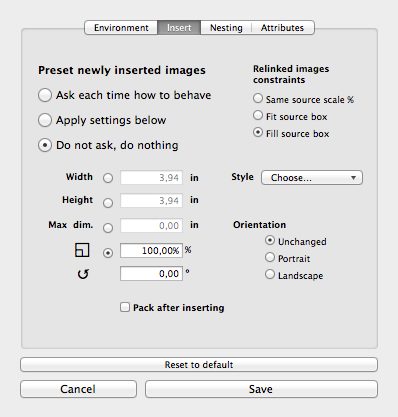
Here you can establish how to behave when inserting new images on the FitPlot area. These regards resizing, constraining, rotating and applying styles as well as nesting after insertion.
You may prefer to be asked each time if apply presets or not, and apply or not automatically.
- Width, Height, Max dim and Scale% let you resize the newly imported images. To be neutral in resizing, choose scale % and leave 100 as value.
- Rotation lets you rotate of the given angle (in degrees) the just imported image. Leave 0° for no rotation at all.
- Style: here you can choose one or more from the available styles in the popup list.
- Orientation: here you establish how to orient images when inserted; unchanged is the default. You can force images to rotate to portrait or landscape.
- Pack after insertion: check this to automatically pack all objects currently in the FitPlot document. The nesting is done accordingly to the nesting preferences.
Relinked images constraints
Since 5.5 version we have 3 options when replacing an image with another, using the relink feature ([change] button in the info panel or double click on the image). These options are:
- Same source scale %: this is the old behavior, the replacing image assume the scale % of the source.
- Fit source box: in this case the replacing image is scaled to match opportunely one side of the box, centering the image in the box and leaving blank the exceeding spaces.
- Fill source box: with this option, the box is entirely filled by the replacing image, scaling it opportunely and cropping the exceeding part to maintain the source ratio.
Nesting preferences

From the 2.6 version of FitPlot (on user suggestions) the nesting algorithm has been improved including now two options, one suitable for users with single page printers and one suitable for plotters where the width is the roll width and the height is virtually unlimited.
- Single page: in this case, the algorithm will try to fit images in the page area (if it is possible).
When the area is full, a new page is added and filled with the remaining images, and so on until no image has left. - Plotter with roll: this time the page will be only one, but its size will vary, shrinking or expanding to contain all images. Images are placed fitting the width of the roll and increasing the page length any time is needed (new rows).
- Pack in area: images are placed inside an area that the user will be prompted to define.
- Gap: this value will be added to separate adjacent images.
- Allow 90° rotation: if checked, a calculation will be performed to see if there is a convenience rotating 90° some image (in terms of Y values reached). If convenient the algorithm is performed with possible rotation on some images.
- Pack only selected objects: with this option, the nesting will be performed only on a selected set of the images on the document. In case of just imported images, these are the "only selected" ones.
- Pack all objects: this is the default behavior of the nesting algorithm. It acts on all objects in the document, selected or not.
- Max Rect Heuristic Algorithms: these are the approaches FitPlot uses to better fit the images in the available space. When more than the default (BSSF) options are checked, the program will test each one and finally choose the best one. Time of process will be obviously longer. More info about this argument here.
Attributes preferences
Since version 3.5 it is possible to copy attributes from an image and apply the same attributes (paste) to another one.
You can copy dimensions (area), angle, shadow attribute, line, dash, tag together with image retouch settings.
Which attributes to copy / paste and which not is determined in the "attributes" tab in the preferences panel.

Note: The image adjust panel has its own push button to copy / paste just the image retouch attributes.