 english
  italiano
What Plumb-Bob can do?
With Plumb-Bob you are able to transform an usual picture in a plan view.
FROM TO
TO

TO
It is sufficient to know 4 key points of the plan to rectify.
Plumb-Bob is useful in many fields, architectural survey, building renovation, furnishing design, estate agents, and it represents a real completion for the metric / photographic survey.
How it works?
Prerequisites:
- A picture not too big (2 MegaPixels are enough), where four known key points are clearly visible.
- The real coordinates of the 4 key points. These points have to lay on the same plan we want to survey and they have not to be on the same line (not collinear). The more distant the points are and the less will be the margin of error.
Let's go!
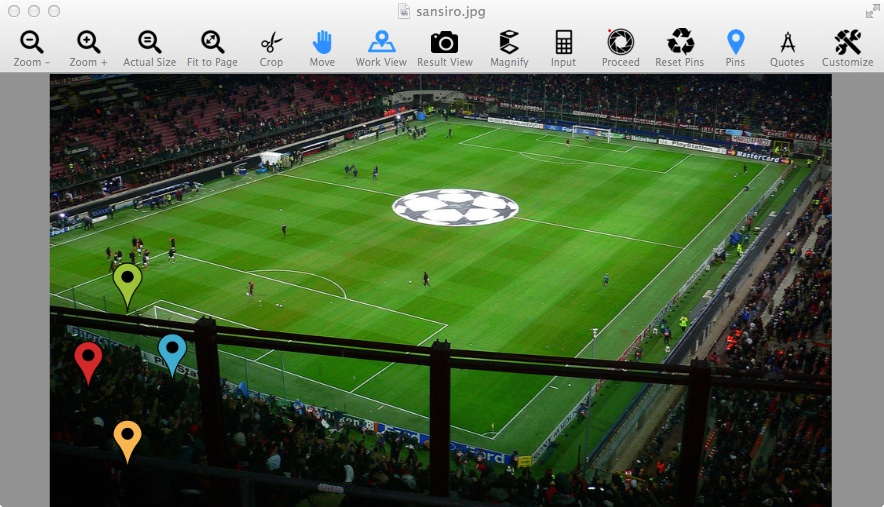
Open the picture with Plumb-Bob.
As the picture appears, you will see at the lower left corner the four pins you have to place in correnspondance of the 4 key points.
Before to go on reading, you should watch Plumb-Bob at work as showed in the short video (also in HD) here below.
Place the key pins


Click and drag the red pin first and place it close to the first known point.
Repeat the same with the green, the blue and the yellow ones.
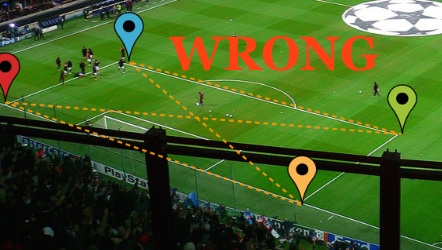
Take care not to cross the points (watch the four-sides outline that appears when dragging the pins).

At full precision
Placing precisely the pins is fundamental.
This is what the Magnifier tool ![]() is for.
is for.

With the magnifier glass activated, adjust the blow-up then click and drag the glass over the image.
When arriving close to a point to get, use the arrow keys to finely move the glass cross-hair in the exact point.
In case the exact point is covered by the previously placed pin, move the cross-hair just above then click on the push button of the same color of the pin you are placing.
The pin will be placed exactly where the cross-hair is.
Now you can move again the magnifier toward the key point, now revealed, and click again the button of the corrensponding color.
Repeat the same with the remaining pins.
Input data
Once you get all pins accurately placed, it's time to insert the corrensponding real values.
Activate the Input Panel ![]() and type the known values in the cartesian form
and type the known values in the cartesian form (x, y).
As in a cartesian plane, you should start giving (0, 0) to the lowest left point (better use the red pin first) and, in clockwise order, assign the other points (green, blue, yellow) a value referred to the origin.
You can choose any decimal unit of measure, no matter which one.
The resulting image is rendered at the best resolution possible, but it does not take care of the scale.
Note that it is possible to resample the resulting image to a more appropriate scale. Just bring up the resample panel (from the menu View -> Show / Hide Resample to Scale Panel [⌘⇧R] or from the push button ![]() in the toolbar) and input units and scale as you wish.
in the toolbar) and input units and scale as you wish.
For example, the goal area of a soccer field (as the one shown in the picture above) is, for the laws of the game, 40.3x16.5 meters (or 44x18 yards), while the overall lenght x width may vary (see https://en.wikipedia.org/wiki/Football_pitch).

Giving this values, we can determine, as we will see later, the exact dimensions of the field.
Processing…
Once you fed-up the real data to the program, all is ready to perform the perspective rectification.
Click on the Proceed icon ![]() in the toolbar or in the input panel and in a while you'll see the result (Result View
in the toolbar or in the input panel and in a while you'll see the result (Result View ![]() ).
).
Depending on the needed correction, the corner of the image will be teared or stretched and the area generated will be filled with diagonal stripes.
It may happen, sometimes, that the tearing / stretching is too much exaggerated, no image is created.
In such occasions an alert is shown and we have to go back to the work view ![]() , check first if each real coordinates for each key pin are correct and, eventually use the crop tool
, check first if each real coordinates for each key pin are correct and, eventually use the crop tool ![]() to trim the image leaving, as much as possible, the mere part of the image which is really valuable for your needs.
to trim the image leaving, as much as possible, the mere part of the image which is really valuable for your needs.
Resample to Scale¹
(¹) Premise
The Resample to Scale tool has some limitation when operating in MacOS X previous to 10.10, but to not exclude the many users who are still using 10.8 or al 10.9, I have decided to release Plumb-Bob 2.2 anyway.
The limitation resides in the fact that rectified images are saved, with 10.8 and 10.9, always and only at 72dpi resolution, while with Yosemite or El Capitan, saved rectified images maintain (as it should be) the original image's resolution.
Since the program carries out calculations relying on original images resolutions, when these are not at 72dpi, the rectified image, even if resampled, will get (with MacOSX pre 10.10) a scale equal to 72/X times the scale you have set, where X = original dpi and 72 is the dpi of the saved image.
For example, on original image has resolution 200dpi, it is rectified, resampled to 1:10 and saved. On MacOSX pre 10.10 the resulting scale will be 1:[10*(72/200)] = 1:3,6.
Of course all this it will not happen if the original image has 72dpi resolution, either our Mac will be updated to 10.10 or more.
Said this deserved premise, let's take a look how this new feature works:
Menu View -> Show / Hide Resample to Scale Panel [⌘⇧R] or push button ![]() in the toolbar
in the toolbar
Since the rectified image ends up to have a scale different from what you are used to, it is possible to resample it (before saving it!) in order to have a known common scale (such 1:10, for example).

As you can see, the above panel shows the image resolution (in dot per inches) inherited from the input image. This value is read only but it is involved, with the selected unit of measure, in the current scale calculation.
- As a first step select the unit you have used for your key points coordinates and read the current scale value.
- Now set the new scale from the popup list. My advice is to choose an item that is nearer to the current scale. This is to avoid a resampling too exaggerated (up or down), though you can choose any scale in the popup list.
You can check the fields below showing current and resampled image values (pixels and Mb) so you can have an idea of the resampling.
- Click resample and the result image will change, ready to be saved at the new scale you have selected.
Saving the result

As we can see in the example above, the image has been stretched and teared and striped area has been generated.
Again, use the crop tool ![]() to get rid of the useless areas.
to get rid of the useless areas.
Then you can save the resulting image that is rectified and, if you have resampled it, in scale.
Lately you may want to use the image as template in your CAD application, importing and rescaling it in order to retrace the drawing.
Also you may want to print it in scale, using the program ![]() FitPlot that has a specific rescale function, see here.
FitPlot that has a specific rescale function, see here.
Saving the work
You can save the document you are working on, preserving the parameters calculated, the position of the pins, the link to the image surveyed.
Usually the rectifying operation is performed once but you may want to come back to the work to take some measures on the image.
You can save your work in a proprietary file (pbf) with the following icon:

Goodies, tips and tricks
Advices
Choose the orientation: since the rectified image has, more or less, the same size as the original one (actually it may be 0.5, 1 or 2 times the max dimension of the source image, you can see this setting in the program preferences panel), it is convenient, aiming to rectified area best resolution, to orient coordinates in order to have the widest side of the rectified area on the widest side of the source image.
For example, getting back to the stadium picture showed at the beginning, it is sufficient to exchange coordinates x with y. The soccer field will be projected horizontally, with some benefit in resolution.
Another way to earn some resolution for the area of interest, is to crop as much as possible reducing the source image to the mere zone to rectify, before to operate the rectifying.
At last, it is possible to set the enlargement multiplier at his max (2x) in the preferences panel, unless it yields an image too big, in such cases an alert will advise that the rectifying is not possible.
Restrict the rectified area: sometimes images have to be stretched so much that the resulting image may result very big, so, even when constrained to an acceptable dimension (see previous entry), the result may be incorrect or an error may be generated.
If you get error or incorrect results, try the Rectify only key points area (see preferences panel) or crop the original image leaving only the parts you are interested in.
Quotes
 --- 100 ---

After the result image is produced the icon of the Proceed tool changes in ![]() (note the green dot in place of the red one).
(note the green dot in place of the red one).
This means that now the program has the parameters to convert a point in the picture in a point on the plan (of course, only the point on the plan are calculated correctly).
Activating the quote tool ![]() , a couple of pins (purple and magenta) appear on the scene
, a couple of pins (purple and magenta) appear on the scene


As you can see, the calculated overall dimensions of the game field are 105x68 meters that is the exactly what is officially declared in the wikipedia San Siro, Milan, Italy page https://en.wikipedia.org/wiki/San_Siro.
Real coordinates
When the parameters are calculated, also the Magnifier tool acquires a new power.
Click on the shift-lock [⇪] on your keyboard and the lens will show the underlying point in cartesian form.

Tips
When using the magnifier, press the alt-key [⌥ alt] on the keyboard to see the shown text and cross hair in white color (useful when moving on dark areas)
Press the command key [⌘ cmd] on the keyboard and you should see magnifier text and cross hair in the color set in the preferences for the guidelines.
If calculation was performed, double clicking on quote pins will show the real coordinates, else it will show the image coordinates (in pixels).
Double click on key pins will show a pop-up letting you to input the real values directly.
The same pop-up is showed when clicking on a coloured button in the input panel.
Lens Correction
Since the photos to rectify are often taken with wide-angle lenses (wider field of view), they suffer the lens distortion (barrel) problem that may disturb the placing of the key points and may affect the precision of the resulting image.
Plumb-Bob has an internal tool to correct the distortion.
The lens correction panel holds a set of controls and a preview image to see the counter-distortion before to apply the correction to the work image

Important prerequisite
The correction algorithm rely on the focal center that has to be the exact center of the image.
Do not crop the image before to enter the image correction, else result may be affected by the misplaced center.
Even if the picture has been cropped elsewhere (also in the camera's editing tools), the center of the image and the center of the focal are no more coincident.
Correction by hand
Move first the B slider then, if necessary, use the others (A and C) until you reach an acceptable result.
Apply the correction to the work view image.
Correction with Lensfun
Thanks to the Lensfun database (release 0.3.2) - see credits at the bottom of this page, included in Plumb-Bob, the correction parameters are set by choosing the camera / lens / focal popups.
The EXIF data about the current image's lens model and focal length are showed, if available, ont the top right side of the lens correction panel.
Just select the three popups in the order Camera / Lens / Focal, to get the A, B and C parameters set for you (if your device is present in the database, of course).
Apply the correction to the work view image.
Image Adjust
Choose Menu View -> Show / Hide Image Adjust Panel or click the ![]() icon in the toolbar.
icon in the toolbar.

With this panel it is easy to control the image parameters, lightening dark areas, contrasting to show edges etc. making easier to place the key pins on the image.
The panel shows a series of adjusting cursors on the left and a preview area in the image real 1:1 resolution.
To move the preview area, just move the cursor over it and scroll to the desired position.
Note: only the real size preview is updated in real time as you move the adjusting cursors. To confirm the adjustment to the work image, just click on the button "Apply to Work View".
To update also the magnifyer view just start to drag to force the redraw.
A case study
Outdoor Signage
Signs must comply with regulations, and, often, the rendering of the facade with the signage is in the city delegated authority requirements list.
This method explains an easy way to render the sign exactly in place:
- Let's take a snapshot of the facade and survey the needed measures.

- Write down the size (in pixels) of the picture that is 3072x2048, we will see later what this is for.
- Open the picture with Plumb-Bob, place the pins and input the coordinates of the key points.

- Click on "Proceed" to get the rectified image.

- Save the image and use it to insert the sign in place. The image is in plain view respect to the wall we are placing the sign to.
In my example I have used an image editing program, I have placed the sign on a different level and styled it with a shadow to simulate the thickness and the detachment from the wall.

- Save this image and open it in plumb bob to make the reverse operation. Place the key pins on the image "previous" corners and input coordinates derived from original picture size (3072x2048 pixels).

- Clicking on "Proceed" the calculated distortion will bring back to the original perspective, this time with the signage perfectly placed.
 The last thing to do is a "crop" of the unused area and save the image (see picture below).

That's all.
Reverse engineering
Grass Signs Advertising
It's easy, with this software, obtain eye-catching grass signs advertising, creating the optical illusion that the brand painted on the grass is actually on-screen.
We want our logo appearing in this way on your TV screen (when framed with this fixed camera).

Making the rectifying procedure we obtain the distortion of the logo as showed here below.

This is simple, but we have to take care of same points of reference to be sure to paint the logo in the right place.
Moreover, we have to distort the logo starting from an high resolution image, for a professional printing workflow.
One by one steps…
- If your logo has not points of reference, (the one we show is round!), paint 4 key points on it (the red/green/blue/yellow dots at the corners).
- Position and resize the logo on the picture as you want to see in the tv frame when painted on the field.
- Proceed placing the key pins on the picture known key points (the goal area corner of the example shown above).
- Input the real point for each pin and click Proceed.
- The resulting image is calculated, but we need to get back to the working image…
- On the working image, activate the Magnifier clicking on the shift-lock key on the keyboard, to show the real coordinates of the lens cross-hair.

- Move on each of the four key points of the logo writing down1 the coordinates (you can type them directly in the input Panel2).
- Open the Hi-res logo (the one with the four key points painted).
- Place the key pins on each key point and input the corrensponding "real" (calculated) coordinates (2 you should have it typed in the input panel).
- Click proceed and you should obtain the following:

- Trim and save the image.
- The real coordinates you wrote down (1) have to be used when placing the logo in the real world.
The Preferences Panel
Some settings are customisable to get the best from Plumb-Bob

- Always Show Guidelines: guidelines are showed when dragging the pins. To let them remain always, check this.
- Guidelines Color: change the color to get the best help from the guidelines.
- Guidelines Thickness: choose from various thicknesses.
- Dashed Guidelines: dashed or solid, as you like!
- Restore last key points position: you'll find the key points where you left them in your last session. If they are offscreen, just click
 "reset pins" in the toolbar.
 - Show sample image at start / or, alternatively, open last used image.
- Result image factor: the resulting image size depends from the original size. The maximum dimension of the resulting image can be 0.5, 1 or 2 times the max dimension of the original. This can be useful because the stretching of the image (in the rectification process) can generate very large images that has to be constrained in an acceptable size (0.5x, 1x, 2x). See also the next entry.
- Rectify the whole picture / or, alternatively rectify only key points area. As in the previous entry, this is useful when resulting images are overstretched and limiting the rectification just to the area around the key points may help.
System Requirements
Plumb-Bob (version 4.0) needs at least Mac OS 10.8 and is downloadable only from the Mac App Store.
Plumb-Bob (version 3.0) needs at least Mac OS 10.8 and is downloadable only from the Mac App Store.
Plumb-Bob (version 2.5) needs at least Mac OS 10.8 and is downloadable only from the Mac App Store.
Plumb-Bob (version 1 through 2.2) needs at least Mac OS 10.8 and is downloadable only from the Mac App Store.
![]()
Changelog
Plumb-Bob 4.0
2021-12-29
Minimum System Requirements Mac OS X 10.8
- Universal version: PlumbBob runs natively on both Apple silicon and Intel-based Mac.
- Pin points numbered
- Undo move (pin points)
- Magnifying lens light (with Caps lock On / Off)
- Magnifying lens hairline view options (alt, cmd, ctrl keys)
- Scroll view and hand move updated
- Bug fixing and interface improvements
Plumb-Bob 3.0
2018-10-10
Minimum System Requirements Mac OS X 10.8
Full compatibility with Mac OSX 10.13 (High Sierra)
- Rotate image left/right
- Undo on rotations and crop
- New pin points
- New graphic on startup image
- Bug fixing and minor improvements
Plumb-Bob 2.5
2016-09-13
Minimum System Requirements Mac OS X 10.10
- New option Rectify only key points area to rectify just the area around the key points. See preferences panel.
- New option Restore last key points position to get the pins (when opening a new image) where we left them in the last session. See preferences panel.
- Lens correction panel improved: the preview is bigger.
The chosen lens description is fully visible in a text field (sometimes the pop-up was clipping the text).
Bug fixed: parameters are now updated as you modify your choice in any pop-up. - Lensfun database updated to version 0.3.2 (with more than 50 new lens profiles and another 19 updated calibrations).
- Bug fixing
- Improved interface
Plumb-Bob 2.2
2015-11-04
Minimum System Requirements Mac OS X 10.8
Full compatibility with Mac OSX 10.11 (El Capitan)
- New tool
 Resample to Scala (read here)
 - Lensfun database updated to version 0.3.1
- Bug fixing
- Improved interface
Plumb-Bob 2.0
2015-04-30
Minimum System Requirements Mac OS X 10.8
Improved performances and stability
- Image adjust improved performances: new image adjust panel
- Plumb-Bob doc saving improved: also crops, lens corrections and image adjustments are recorded in the saved file
- Lens correction: the program "remember" the last used lens
- Improved stability
Plumb-Bob 1.6
2015-03-27
Minimum System Requirements Mac OS X 10.8
- Italian localization
- Bug fixing
Plumb-Bob 1.0
2015-03-05
Minimum System Requirements Mac OS X 10.8
First release
Copyright
Plumb-Bob for MacOSX is an original application build from the ground up and is, therefore, copyright protected.
Any similarities to any other application or copyrighted material is purely coincidental.
Downloading of part of this site to your server for the purposes of linking to us is allowed.
Plumb-Bob logo is owned by Paolo Marcuccetti and you may not copy or use it in any manner without prior written consent.
Disclaimer
DISCLAIMER OF WARRANTY:
THE AUTHOR HAS MADE NO EXPRESS WARRANTIES, ORAL OR WRITTEN, TO YOU REGARDING Plumb-Bob.
Plumb-Bob IS BEING PROVIDED TO YOU 'AS IS' WITHOUT WARRANTY OF ANY KIND.
THE AUTHOR SHALL NOT BE LIABLE FOR DIRECT OR INDIRECT DAMAGES RESULTING FROM THE USE OF Plumb-Bob.
YOU USE THIS PROGRAM SOLELY AT YOUR OWN RISK.
Acknowledgements
data/ subdirectory of the source package. You can read it here: Creative Commons Attribution-Share Alike 3.0 Unported or on the Creative Commons Web site.
Privacy Policy
Overview
This Privacy Policy describes how your personal information is handled in Plumb-Bob for Mac.
We Collect No Personal Information Using Our Application
We do not collect, use, save, or have access to any of your personal data recorded in Plumb-Bob for Mac.
Individual settings relating to the Plumb-Bob app are not personal and are stored only on your device. You might also be asked to provide access to your photo library, but this is only so you can open your photos in Plumb-Bob and save them back to your library. We don’t process that information at all and have no access to it.
In addition, if you edit a photo using Plumb-Bob for Mac, location data may be saved in the image, but we have no access to that data and it is not shared with anyone unless you yourself choose to share the image.
Our Applications Comply with the Children’s Online Privacy Protection Act
Plumb-Bob does not collect personal information from anyone, including children under the age of 13.
If you have any questions about this Privacy Policy, feel free to get in touch with us using the form below.