3D Tree by Paolo Marcuccetti©2003-2018
A vector script tool to create 3D trees in Vectorworks®.
A vector script tool to create 3D trees in Vectorworks®.
Launch the script (double click on item 2). You'll be prompted to choose a file, browse through the examples in the downloaded folder named "tree settings" and choose one.
Once confirmed, the tree script starts, it may take a while. When the process ends you should see your just created tree. Edit the new generated classes as you want ("foglie", "rami" etc.), set the lights and perform a rendering.
This script lets you edit the parameter constants and save them.
Double click on the script in the resource editor. You will see [Fig. 1], at the beginning of the script, a series of constant parameters, between the brackets {} there are comments for each parameter.
Change these values to obtain different trees. Experiment with them, be careful to follow {comment} suggestions.
Each time you launch this script and you create your model, the used variables are registered into the standard output file in the Vectorworks® main folder. You can open this file with a text editor and save it with an explicit name into the settings folder (to be reused).
Note: save it as text only [.txt], do not use .doc or other word processor's format.
This script help you to create your own leaves to use in the tree script.
The procedure to add new kind of leaves (or even fruit) to the tree program may result difficult to newbies of VectorScript, because it involves manual modifications of the script.
Leave creator let you rapidly prototype your 3D polygon(s) constituting a single leave's shape.
px,py,pzpoly3D (
px,py,pz,
px+ thisleave*2/10,py-thisleave*1/10,pz+ thisleave* 1/10,
px+ thisleave*3/10,py-thisleave*1/10,pz+ thisleave* 3/10,
px+ thisleave*3/10,py-thisleave*1/10,pz+ thisleave*6/10,
px+ thisleave*2/10,py-thisleave*1/10,pz+ thisleave*8/10,
px,py,pz+ thisleave*12/10,
{axis of the leave, the following points should be simmetrycal}
px,py,pz
);thisleave multiplied for a fraction of the grid.begingroup; to endgroup; (if a leave is made of a single 3d poly, the begin/endgroup are not necessary, so copy only the poly3D() definition).FOGLIA (CASE selection) with a new label (es. 12: poly3D(mypoints....)) prosecuting the previous enumeration and leaving in place the OTHERWISE label.thisfruit dependency. Follow the existing examples as a guide.{+++++++++++++++++++++++++++++++++++++++ SETTINGS +++++++++++++++++++++++++++++++++++++++}
const
{tree}
title = 'Name of the tree'; {Use a few descriptive words}
segmentation = 8; {branch segmentation (increase it for higher resolution).
ATTENTION! if you change it, change even on "setting -> tree" script}
generations = 4; {number of branch generations}
forks = 3; {number of branches that come out from a father branch}
anglebranch = 60; {average angle of branches}
anglevariation = 30; {branches angles max +/- variation%}
length = 100; {first trunk length}
lengthdiv = 1.4; {between 1 (same as father) and 2, half father length}
variation = 30; {branches length +/- variation % }
distribution = 100; {branches distribution along the father branch (0% = children starts at father's end)}
trunkdiam = 20; {the first trunk diameter}
diamvariation = 20; {branches diameter +/- variation%}
diamcoeff = 2.5; {diameter at end of trunk = trunkdiam/diamcoeff}
turbolence = 100; {from 0% (straight branches) to 200% and over}
expturbo = 2; {turbolence exponential (0=no influence, 1 and more increase turbolence effect in smaller branches)}
topconcentration = 2; {concentration of first generation's branches toward top of trunk (1 = fully distributed, >1 = concentrated)}
firstrunkdecreas = 1; {first trunk decreasing (1=normal, >1 less decreasing}
firstrunkbifork = true; {first trunk biforcation (true) or prosecution (false)}
{leaves}
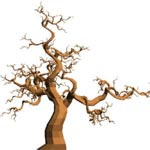
leaves = true; {false if it's wintertime!}
numleaves = 2; {max value = segmentation, one leave each segment of last generation branch, plus the one on top of branch}
leavesize = 10; {size factor for leaves}
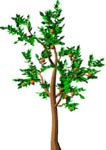
leavetype = 1; {1 = maple, 2 = olive, 3 = pine, 4 = kiwi, 5 = chestnut...up to you to continue...}
leavevariation = 100; {+/- variation% in leaves size}
{fruits or flowers}
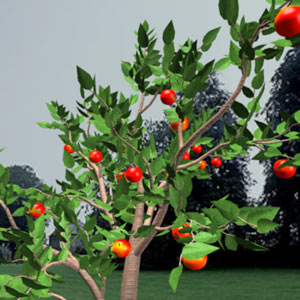
fruits = true; {has fruits?}
fruitsize = 1; {size factor for fruit}
fruitdensity = 5; {one fruit every "fruitdensity" nodes, if branch has the right inclination}
fruitvariation = 10; {+/- variation% in fruit size}
fruitype = 4; {1 = apple, 2 = simple flower, 3 = pear, 4 = ficus, 5 = kiwi...up to you to continue...}
fruitmaxangle = 60; {only on branches &+/- maxangle° inclination toward terrain (90° = no limits)}
{messages}
progression = true; {show progress messages}
liveshow = false;{draw the tree, step by step, but slower process!}
Defining natural trees is a challenge for your computer, though with this simple script it is theoretically possible. As a standard procedure you have to define a point of compromise that yields good rendering results with a reasonable processing time. This point may varies with the hardware you work (processor and RAM).
Here same suggestions to limit memory usage at minimum, up to you to decide if increase it or not:
generations and forks.totnodes := forks^0+forks^1+forks^2+...+forks^generations;