Plumb-Bob plugin by Paolo Marcuccetti ©2020-2026
Perspective rectifier for Vectorworks®
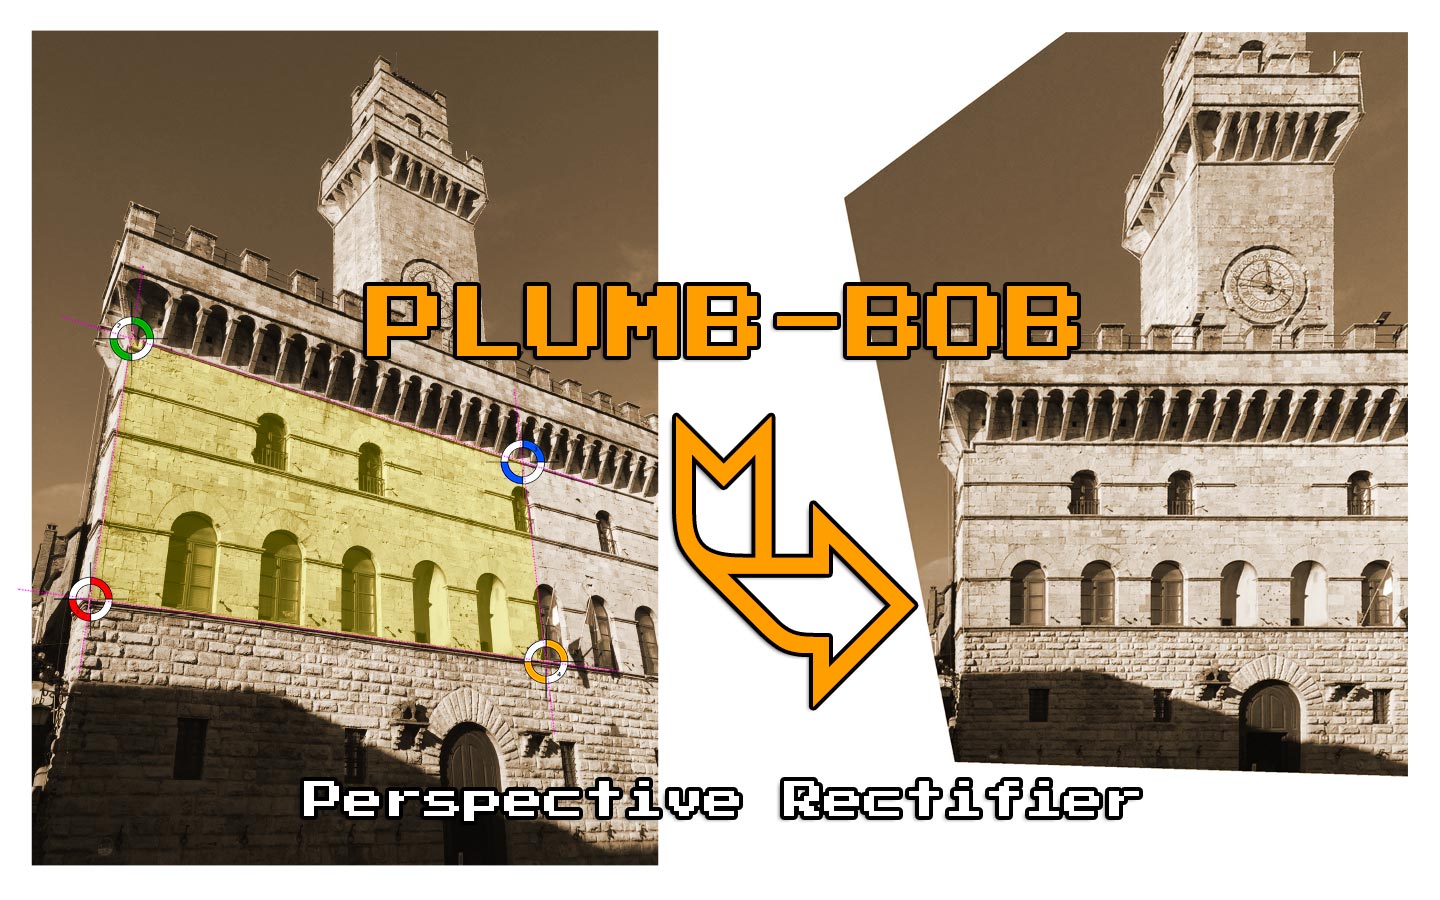
With Plumb-Bob you can transform a perspective picture in a plan view.
With Plumb-Bob you can transform a perspective picture in a plan view.
Plumb-Bob for Vectorworks® is the porting of my successful app I am selling on the Mac App Store, see the official web page.
While Plumb-Bob for Mac is a standalone app and has more options (for example lens correction and image adjust) than the Vectorworks® version, the second inherits the same principle: knowing 4 key points on a perspective plan of a picture, it is possible to rectify that plan.
Plumb-Bob is useful in many fields, architectural survey, building renovation, furnishing design, estate agents, and it represents a real completion for the metric / photographic survey.
• [0,0], • [ 0,300], • [180,300], • [180,0]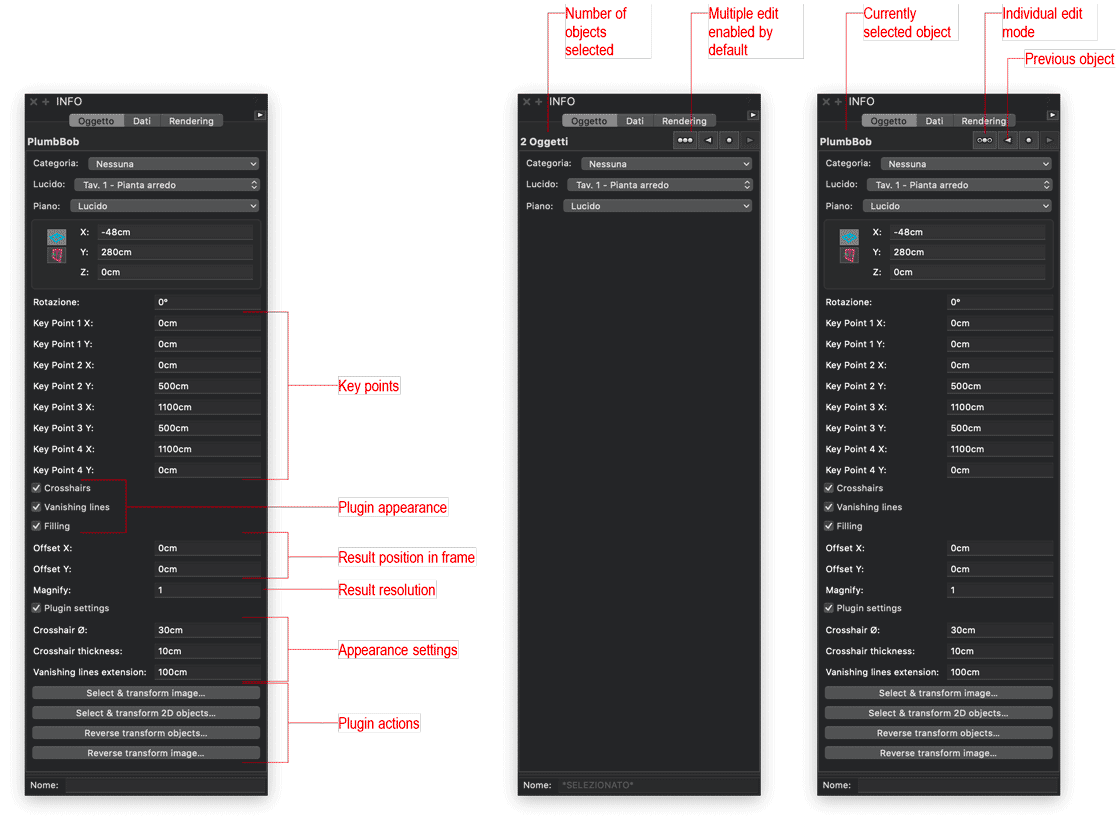
Tip:
When placing the image to rectify on your drawing, consider that key points chosen on the image will end in real points of your drawing space.
So it is advised to move the image sufficiently distant from the area that will be designed to host the resulting rectified image.
Note:
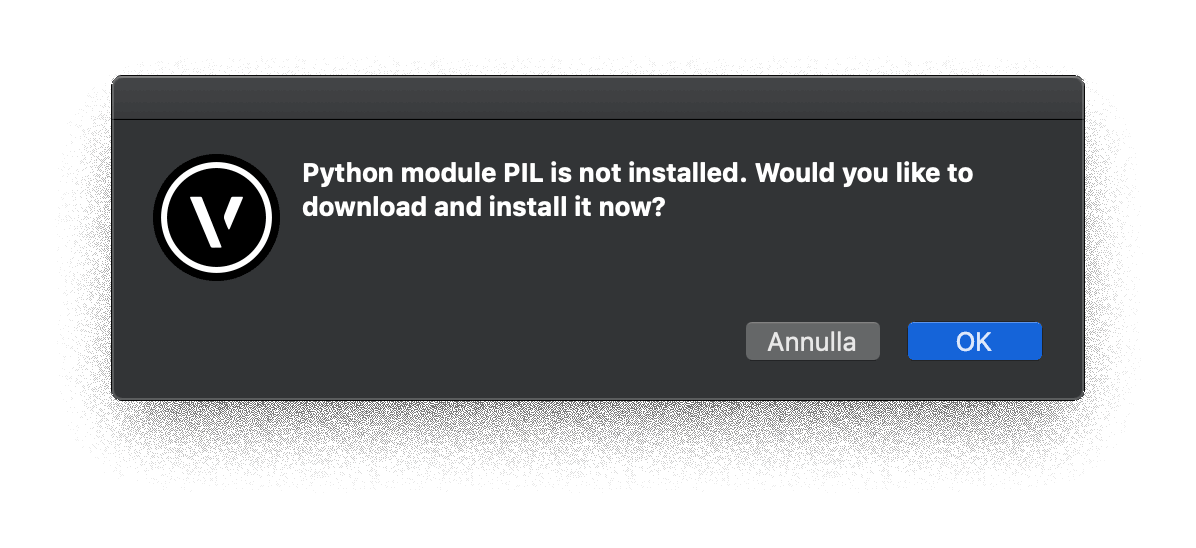
The first time you run the plugin to rectify a bitmap image you should be requested to download and install the Python module PIL, click ok.
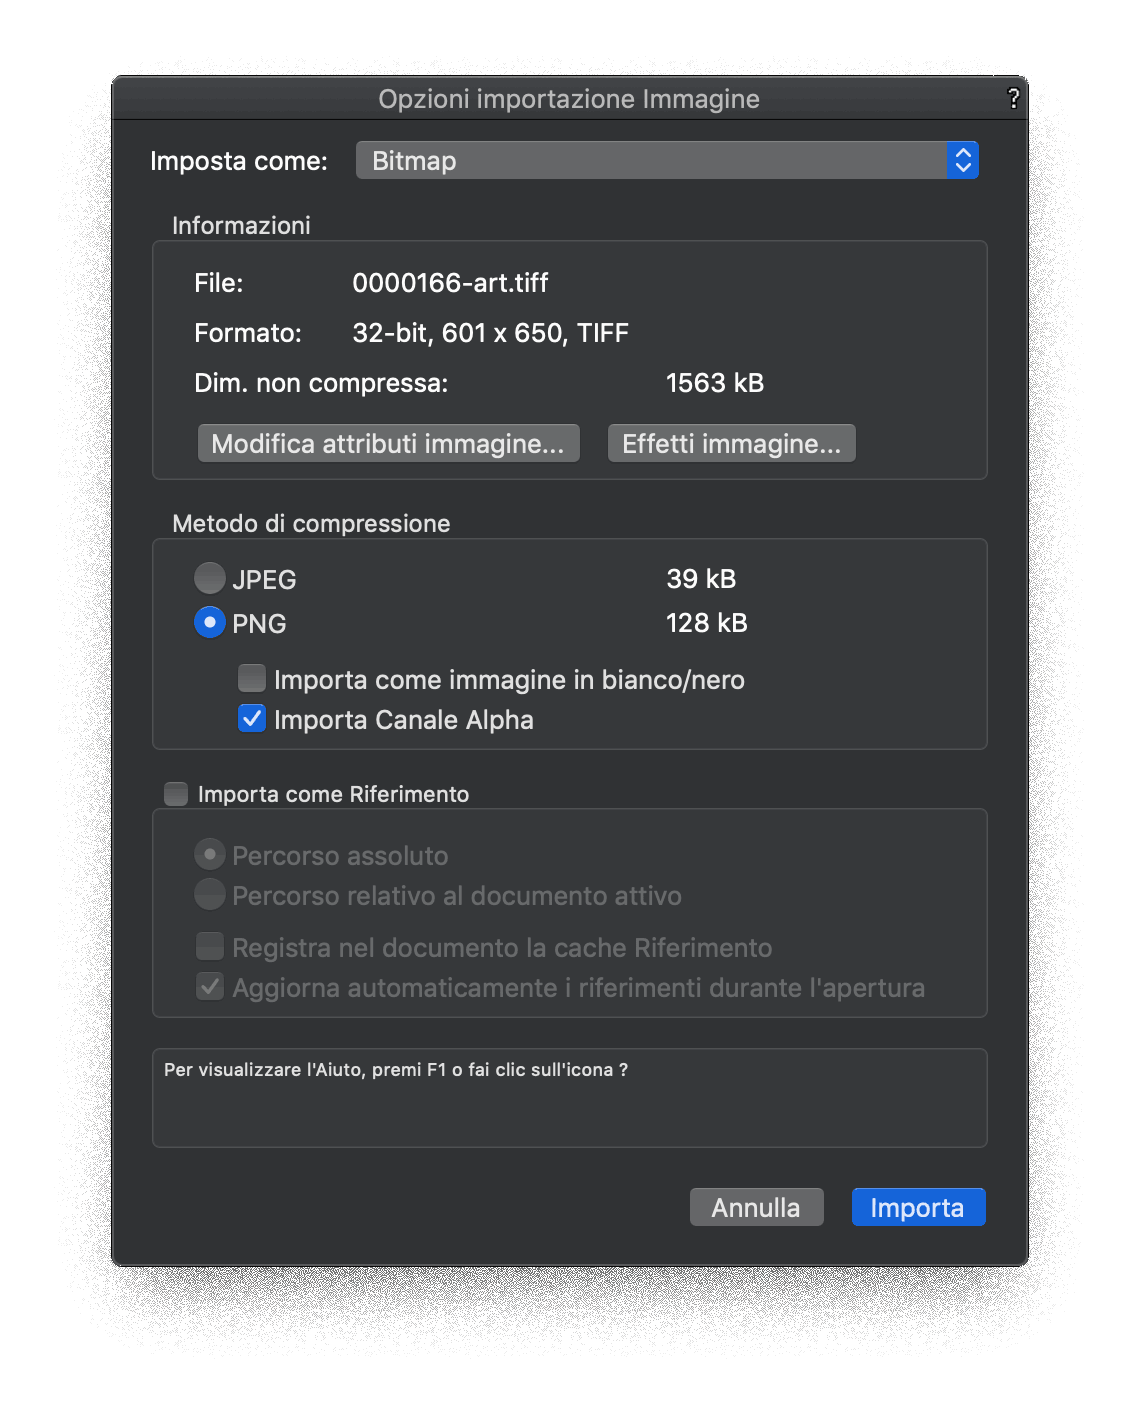
Also you should see (only for the first time) the "insert image" dialog. This dialog is proposed to you so you can choose PNG with alpha channel. Automatic image insertion (without dialog) would have inserted the image as "opaque" JPEG.
The PNG with alpha allows to have transparency on the parts of the transformed image that are generated upon distortion.
All subsequent times you run an image transformation, the program should remember this first choice.
These are for version 1.0 and 1.1 (VW2020® through VW2022®)
From VW2023®+, a new version, 2.0 has simplified these settings, see what's new.
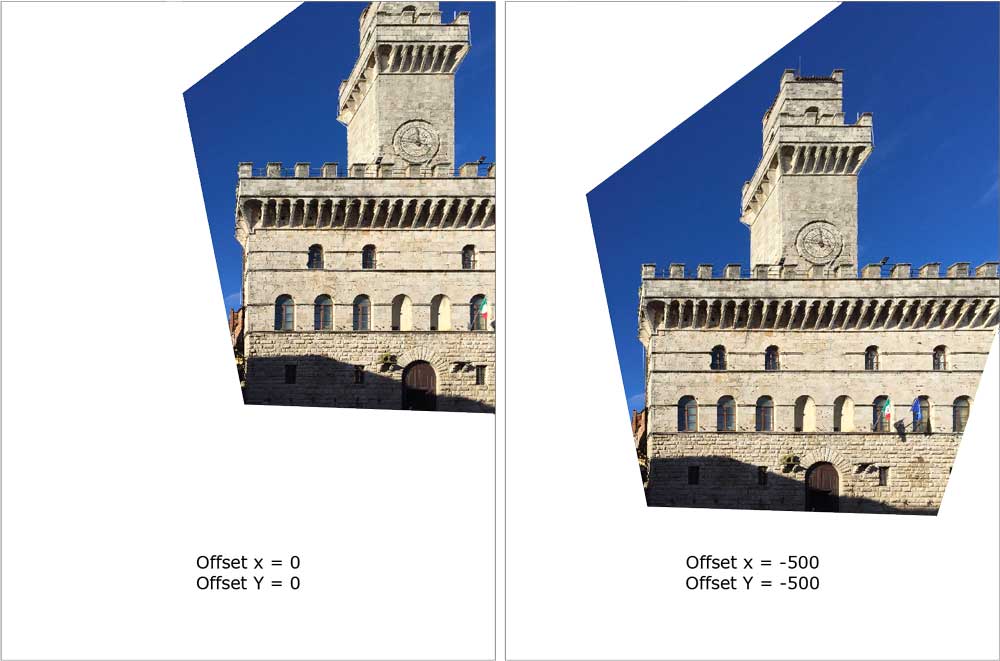
Sometimes the rectified image could end not well centered in the resulting frame and parts of the picture you'd like to see may result clipped out.
You can use the offset fields to center / balance the image in the frame left-right and top-down.
This is a try and error matter, so, if you are unsatisfied of the result, delete the produced image, type offsets values and transform again to see the applied parameters.
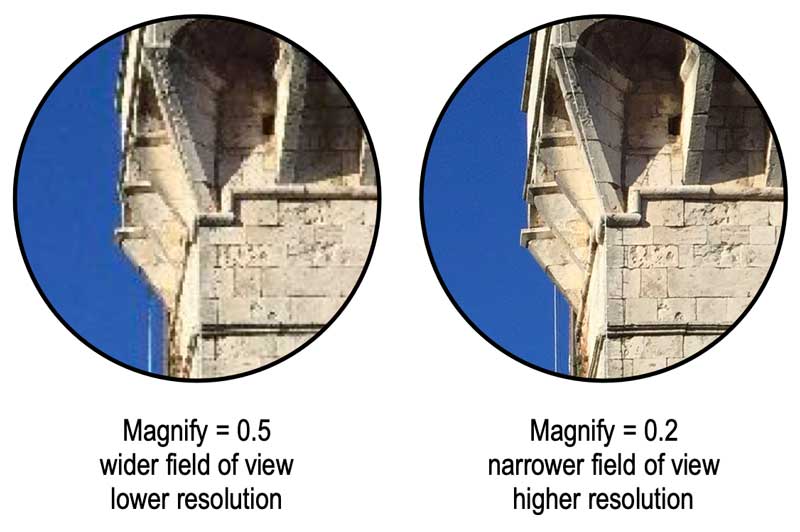
Sometimes your result could be very small (depends on the real points you choose) and when zooming the image you may see low quality details.
To avoid this, use the magnify field. This represents a "resolution" ratio. If you type 2, resolution is doubled.
Remember that higher values (2 or more) require more time to be calculated.
With this new version, there is no more the need to set offsets. The algorithm is able to center the image inside the chosen key points.
Also the image is zoomed in way to include at least the key points in the resulting image.
It remains up to the user the option to change the final resolution of a factor of the original resolution, in order to reduce the time for the image rectification.
Here below the full 2.0 changelog:
Crosshairs, vanishing and fillings are the aspect of the plugin.
You can set them on/off and you can change some of their attributes either in the plugin settings or with the attributes palette.
Note: All available actions are showed in the video posted before.
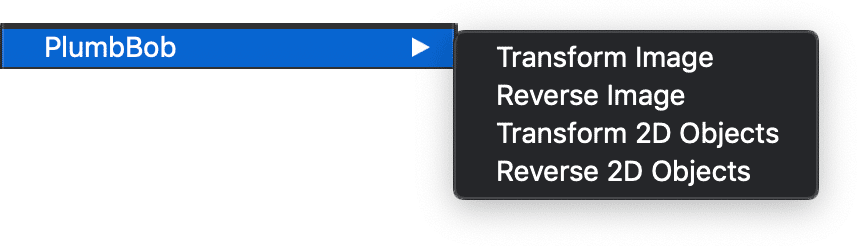
This is the main plugin function: to rectify a perspective picture.
See usage for all the details.
This transforms lines, points, polygons that you trace on the perspective picture.
The usage is the same as the transform image:
You have to select the plugin and all the 2D object, switch the OIP (object info palette) to individual edit mode and click the arrows (previous or next) until the plugin is in front.
At this point, click the button and all your selected 2D objects will be transformed and rectified.
Note that transformed objects will replace the selected ones. If you want to maintain them, then save / duplicate them before transformation.
This is the same as before, but it works from the rectified plan toward the perspective plan.
The same as before, but it works with images.
You can use this to place a shop sign on a perspective picture, for example.
Note: Image transforms (direct and reverse) do not work correctly if the image to transform is rotated in Vectorworks.
Currently there is no way to avoid this, so it is necessary import images that will be correctly oriented in Vectorworks, with no rotation needed.
Note: To have the PlumbBob menus in your interface, see installation below.
The same actions performed by buttons in the Plugin OIP can also be performed with their equivalent menus
Simply select the PlumbBob object together with the object/s / image you want transform, then select the appropriate menu.
Unpacking the downloaded zip file, you'll find these folders:
(*) Note:
The CredentialsPlumbBob.vst file is only present in the 2024, 2025, and 2026 versions, and in fact, it is only used by the 2026 version (and later). These are the credentials the author obtained as a recognized third-party developer for Vectorworks®, and they became necessary due to the stricter security measures introduced with the 2026 release of Vectorworks®.
Follow Paolo Marcuccetti's Gumroad® shop page where you can browse/buy my productions for Vectorworks®.