Overview

- Overview
- What's new (changelog)
- Scenarios
- Print CAD drawings (PDF's) on a plotter
- Print CAD drawings to desired scales
- Print more copies of the same document / image
- Printing images dropped while surfing the net
- PDFs transparent merging
- Huge CAD drawings print
- How to print a poster with a desktop printer
- Preparing a booklet
- Preparing an images preview printing
- Tracking your print work
- Calculating price of your print jobs
- Business Cards Imposition
What can you do with FitPlot
- place various pdfs (or other common graphic formats files such as jpg, tif, gif, eps, psd, image in the pasteBoard) on a virtual plotter sheet;
- arrange all objects in a WYSIWYG environment moving, rotating and scaling them;
- print the so arranged plotter sheet and eventually save it for later printings.
- 1+2+3 = Saving paper and time.
The first idea of FitPlot comes out of a demand, in my daily work, to print wide format documents (typically A0, A1, A2 produced by a CAD program) on a 42" plotter. I always had a remnant of the aside unused paper, and even if I used cheap material, nevertheless it was a waste. Furthermore I often had to print more copies of the same drawing and, printing from the CAD program, I obtained my copies disposed in a single column on the plotter output, while they could have been placed, for example, more than just one in a row.
Summoning all this I start to develop FitPlot that has become un-replaceable in this first task and, as I am surprisingly discovering, in many other uses I'll try to explain in the scenarios section below.
I know this could be done with blazoned vectorial applications, but, these are oversized for this simple task and tough they may do it better (surely they do!), they are not focused on this, therefore, FitPlot has already finished the job while they are still loading, asking all they need to start a new document etc..
FitPlot may take place between the document/s (pdf, jpeg, tiff or other) and the output device. It has not to be an obstacle to your workflow. Keeping this in mind, all possibilities has been explored to develop a program that speed up the layout work (assembling images in the plotter sheet); the use of a customizable toolbar, with all the preferred commands at hand. All editing such moving, rotating, resizing can be made both manually and numerically. And more, specialized tasks such nesting, serial duplication and even booklet imposition are all there at your disposal to make FitPlot a versatile printer companion, customizable to your needs and with its own peculiarities that other programs do not offer.
You are invited to post your feedback, suggestions, ideas, critics using the form at the end of page.
Scenarios
1. Print CAD drawings (PDF's) on a plotter
- Launch FitPlot.
- Drag all your PDFs files on the FitPlot main window.
- Click on the nesting tool
 in the toolbar*.
- In the showing dialog click on the "shrink / expand" option, both in vertical and in horizontal. This makes the current page size to adjust at the minimal size containing all your objects (you should have set the page size ranges in the margins setup dialog see details in nesting section and margins setup section). Click confirm.
- If the result is good, print, else undo and start again.
2. Print CAD drawings to desired scales
If you are a CAD user, you should be interested in this new FitPlot powerful tool:
Imagine you have received a drawing by email from a collegue. The drawing is in a scale 1:10 (for example) and you want, for a first evaluation, to print a copy more handy (1:20, for example).
- Open FitPlot and insert the drawing to rescale.
- From the "tools" menu, choose "Drawing Scale…" menu, a dialog appears:
- In the "current scale" popup choose 1:10.
- In the target scale popup choose 1:20.
- Click Ok and the drawing is resized automatically (in this case of a 50%).
Now, imagine another more complicated situation:
you have received a drawing in an undeterminated scale, that is, you have the drawing, some quote is present on it, but your ruler scale has not match. Here's the trick:
- Open FitPlot and insert the image to rescale.
- From the "tools" menu, choose "Drawing Scale…" menu, the dialog appears.
- This time, click the button "Measure".
- Click and drag on the drawing as to draw a "quote" precisely above a present quoted wall or element.
- Once released the mouse on the quote end point, the dialog comes up again. Type the measured quote and the drawing unit (as it should be, for example "500" and "cm").
- Choose the target scale.
- Click Ok and the drawing is resized automatically to the target scale.
You can watch here an illustrated example of this command.
Here below a YouTube video where this procedure is practically showed:
You can also watch other FitPlot lessons on YouTube at FitPlot YouTube Channel
3. Print more copies of the same document / image
- Launch FitPlot.
- Set the desired page size (see set page size).
- Insert the image to print in more copies.
- Place with the top-left corner near the origin of the printable area.
- Apply the desired style (trim marks, stroke etc.)
- Click on the serial duplication tool
 in the toolbar*
- In the showing dialog fill the fields requesting the number of copies in horizontal and in vertical. Below there are two fields to set spacing between copies. They are preset, for convenience, with the width/height value of the object to replicate, to obtain contiguos copies. More below, there is a checkbox that, in case of multipage PDFs, increase the page number at each copy, with the numbering flowing from left to right and from top to bottom. Click confirm.
- If the result is good, print, else undo and start again.
4. Printing images dropped while surfing the net
- Launch FitPlot and the web browser.
- Set the desired page size (see set page size).
- With the browser window on top, leave a screen portion to let FitPlot work area visible. When you find an image you want to print, drag and drop it from the web browser to FitPlot. When you are finished with the browser (or images are enough along with the chosen page size), pass to FitPlot to adjust the layout (move, resize etc.).
- If the result is good, then print.
Note: FitPlot does not save images data along with its documents. It saves only the "path" to images. Images coming from drag&drop (and images from copy / paste with a different application too), are created on the fly and put in a temporary folder, whith generic unique names. Whenever the FitPlot document is closed, we are asked to save (name and location) possible temporary images inserted in the saving document. In this way we assure to have all needed images when reopening that document.
5. PDFs transparent merging
It happens sometime, in my work, to send by e-mail text documents paged in the official company headed paper.
A fundamental ingredient for this procedure is the company headed paper in PDF. If you do not have it, ask to your typography or your graphic designer.
- Prepare your document with your text editor as you usually do, to have it printed on your real headed paper.
- Instead of print it, save it as PDF (all Mac programs can do this, directly or via the printing dialog).
- Launch FitPlot.
- Choose the page size according to your headed paper.
- Insert the company headed paper PDF and set its top-left corner to (0,0).
- Insert the letter you prepared and do the same as above.
- Apply the style "PDF transparency" to the letter, the underlying company headed paper it is now visible.
- From the menu File select the item "Export as PDF".
- Attach the just exported document to the e-mail and send it.
Note: in case your letter is more than one page, do the same until the point 7, then select all (cmd-A) and use the serial duplication tool (from the tool menu or in the toolbar). In the dialog showing up fill the fields as follows:
- put 1 in the #horizontal field
- put the number of pages of your letter in the #vertical field
- put zero in the horizontal distance in the horizontal distance field
- put the value of the vertical page size in the vertical distance field
- check the increase PDF pages checkbox
- click OK / confirm.
- From the file menu or in the toolbar, use the pagination tool. In the dialog showing up:
- put 1 in the horizontal pages field
- put the number of pages of your letter in the vertical pages field
- leave 0 in both overlap fields (overlap is no needed here!)
- click OK / confirm.
- now your pages should be ready to be printed / exported / viewed. Check them opening the pages drawer (click on the icon
 at the top right of the main window, just above the max zoom control.
- Now continue from the point [VIII].
Here below a YouTube video where this procedure is practically showed:
and here's part 2:You can also watch other FitPlot lessons on YouTube at FitPlot YouTube Channel
6. Huge CAD drawings print
Here's another "peculiar" use of FitPlot that comes directly from my daily work experience that may be what you have searched in vane.
In my daily work I am requested to supply our joiner's workshop with 1:1 scale drawings. We made shop furnishing and they take full advantage of this prints in speeding up their work. From my side, it has been always a difficult work, paginating a drawing of a full 1:1 room in a 42 inches plotter roll, since FitPlot! Here's how you should do with a 6x6 mt. print:
- In your CAD program set the scale to 1:10 (or the max scale you can according with the max available page sizes), so the whole 6x6 fits a 60x60 cm page size.
- Print / export the drawing as PDF.
- Launch FitPlot.
- Insert the just created PDF.
- Regain the 1:1 scale resizing the PDF to 1000% (remember, you set 1:10 at first point ).
Note: as side-effect, you will have lines ten times thicker, so, if it is important, scale line thickness of a 10 factor in your cad drawings before exporting to PDF. - Set the top-left corner of the PDF to the top-left sheet margins.
- Resize the page to the max wideness (for example 36" / 91 cm) for a length of 6 meters.
- From the file menu or in the toolbar, use the pagination tool. In the dialog showing up:
- put 7 in the horizontal pages field (600/91 = 6.6)
- put 1 in the vertical pages field (6 meters per page = 1 vertical page)
- put at least 5 cm in the horizontal overlap field and 0 in the vertical (this is essential to recompose the jig saw).
- click OK / confirm.
- now your pages should be ready to be printed. Check them opening te pages drawer (click on the small arrow at the top right of the main window, just above the max zoom control.
- If the result is good and there is no part of the image left out, print, else try to change overlap according to the number of horizontal pages.
7. How to print a poster with a desktop printer
How to print a big size poster with a common A4/Letter desktop printer at our disposal?
Granted that an image, if not purely vectorial, is subject to loose resolution according to the magnification (so it's better do it from a good resolution original!), we can obtain a maxiposter from a desktop printer as follows:
- Launch FitPlot.
- Insert the image to enlarge.
- Resize it in the desired final dimensions (use the width / height fields in the info panel to impose the wanted dimension).
- From the file menu or in the toolbar, use the pagination tool. In the dialog showing up:
- type the needed number of horizontal pages (total width / printer page width)
- type the needed number of vertical pages (total height / printer page height)
- if your printer has the "print without border" option, leave the overlap fields to 0, else, if you have the time and patience to trim all pages because you don't like the white borders, set the overlap values with the printer margins values (horizontal and vertical). This last thing may change the number of pages needed to obtain the whole image.
- Optionally you can print registration marks for an easier rejoining.
- click OK / confirm.
- now your pages should be ready to be printed. Check them opening te pages drawer (click on the icon at the top right of the main window, just above the max zoom control.
8. Preparing a booklet
How often we incur in PDF manuals / tutorial / books out here on the web! Usually we print them to have a more comfortable reading. Quick print implies the use of one paper sheet per page (leaving the back blank). Some of you may print the odd pages before, then the even on the corresponding blank side of the just printed sheets. Using FitPlot you can prepare the disposition of the pages in a way typographies do to print book. On a desktop printer this may result in a 4 pages per paper sheet, 8 in an A3 printer.
All you have to do is to import the PDF in FitPlot and apply the imposition command, then you'll have your pages disposed in recto e verso to be printed alternatively using the print only odd pages / print only even pages option available on the print dialog.
If you own a duplex printer, just send the pages sequentially (from first to last).
The imposition command has its own subject in this help file, so go there for detailed instructions.
Here below a YouTube video where this procedure is practically showed:
You can also watch other FitPlot lessons on YouTube at FitPlot YouTube Channel
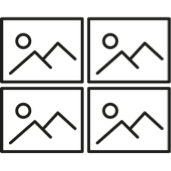
9. Preparing an images preview printing
Here's explained an easy way to layout automatically a folder of images for a quick print preview.
Using the new insert options available in the preference panel (see figure below) it is possible to make some operation on the newly inserted images in a way to show them resized and tidily laid out, optionally showing each one its file name tag.

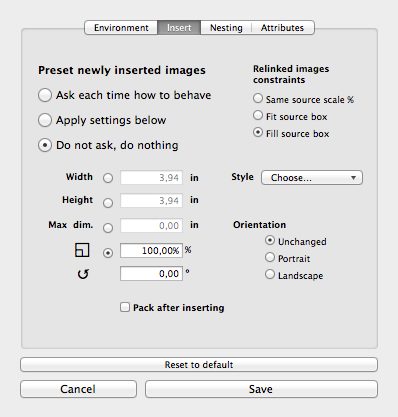
- Click on apply settings below option.
- Click on Width (or Height) constrain field button.
- Type the constrain Width (or Height) field value, this will cause all imported images to be resized to this width (or height) value.
- Choose the File name tag style option (and any other style you desire to be applied, shadow, line, trims etc.).
- Click on the Pack after inserting check box button (see nesting preferences).
- Insert your images by dropping them or by using the insert images tool
 . You can drop or insert more than one image at a time. In the browse files dialog (when inserting from menu or the command tool), choose / select all images you want to add clicking on them while holding the shift-key (if they are consequent in the list) or while holding the command-key if they are not consequent. Click the open button when you are finished et voilà.
10. Tracking your print work
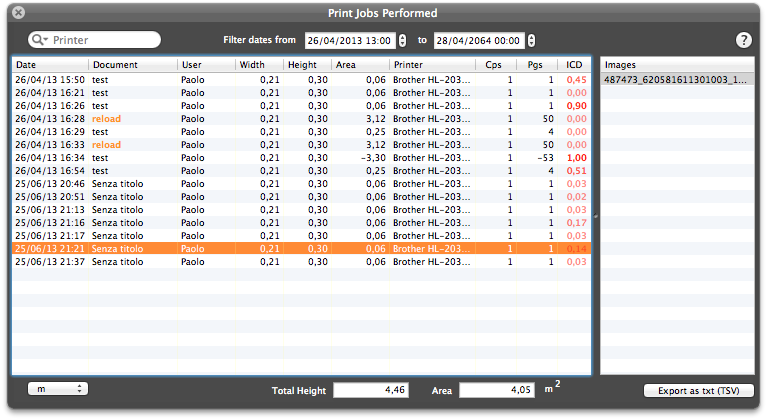
From the 2.7 version of FitPlot you can easily track your print work. A couple of log files are created and updated each print you perform via FitPlot. You can import these files in a database or in a spreadsheet where you can extract statistics, billings, invoices etc.
FitPlot 4.5 and more has a log browser accessible directly inside the program, by the View menu [cmd-shift L] or by the toolbar* equivalent button ![]() .
.
Look here for further explanations.
11. Calculating price of your print jobs
A new feature introduced in FitPlot 4.7 allows to know a key value useful in estimating the ink used in a print job. This parameter is named ICD (ink coverage density).
ICD testify the ink coverage per square unit (density), it ranges from 0 to 1 where 0 is the white sheet and 1 is the black full covered sheet.
Each page has its own ICD that can be asked imediately by the menu View -> Color Index Density or by the toolbar* equivalent button ![]() .
.
The result is showed in a modal dialog like this:
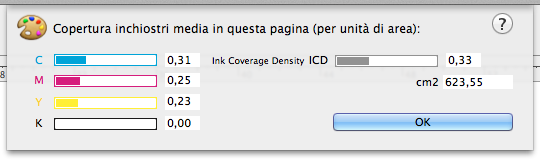
Furthermore, when a document is sent to a printer, a record of the print job is saved in the FitPlot's log file (see tracking your print work). This record is listed in the log browser (directly inside FitPlot since 4.7 version) and contains a field with the value of average ICD of the pages involved in that print job.
ICD gives an important parameter, together with sheet sizes / area (also in the log record) to estimate the effective costs of a print job.
A more deep look about thes new feature can be found here.
12. Business Cards Imposition
This feature allows to easily impose a large number of business cards (or similar jobs) in a prepress layout, automatically composing front / back for you.
Start from the menu Imposition -> Business Cards… or from the equivalent toolbar* button ![]() .
.
This tool has so many customizations that calling it "business card imposition" may be limiting.
In fact it can be applied to every situations where you have front / back compositions of cards / sheets of the same size.
This theme is more precisely documented here.
There is also a practical video demonstration about this from the FitPlot YouTube channel here below:
You can also watch other FitPlot lessons on YouTube at FitPlot YouTube Channel
[*] The toolbar is customizable, so it may be that in the default configuration this tool is not visible. Click on the customize toolbar icon, at the extreme right of the toolbar, to set your preferred tools. Anyway, for each tool there is menu doing the same task.
To know more about toolbar and its customisation click here.