the Tools
FitPlot aims to productivity and versatility, so you can find it useful for many tasks in everyday work related to print.
You can have an idea of the various situations you may find FitPlot both a time saver and an indispensable piece of software in the section scenarios.
Here's a list of the tools you can find in the program. Every tool is available as menu item and as toolbar button. You can customize your toolbar* filling it with the commands you use more frequently just choosing "Customize toolbar…" in the Window menu. Drag the item toward the toolbar to have it available. Drag away from the toolbar to let it disappear from the bar.
[*] The toolbar is below the window title. It is visible by default. Just in case it is hidden, you can let it appear from the Windows menu, Show / Hide the toolbar.
Here a brief list of the currently available tools:
Environment settings toolsSystem tools
Editing tools
Specialized tasks
Export operations
Environment settings tools:
These tools are used to set your FitPlot working environment.
-

 Manual editing off/on
-

 Snap to grid off/on
-
 Grid visibility off/on
-
 Set images quality (screen) low (editing) / high (printing)
 according to this slider in the preferences panel
Important: The slider above, in the environment preferences panel, allows the image's resolution setting when in editing mode, to speed up the redrawing. To see images in high quality to your screen, switch the above toolbar button to "high". When printing, images resolution used is always the best available for each image.
Note that even when high quality (screen) is set, while editing (moving or clipping), low quality image is shown to speed up redrawing.
-

 Set advanced insertion off/on,
see advanced insertion section for further help on this topic.
Set advanced insertion off/on,
see advanced insertion section for further help on this topic.
-
 Open the preference panel, see preferences panel section help on this topic.
-
 Organize toolbar as explained at the beginning of this same page.
Editing tools
- Alignment: you can align or distribute a group of object and, last but not least, you can align objects to the printer margins avoiding printer clipping.


In order of appearance:- Align left (if pushed with the alt-key down, align to the left printer margin).
- Align right (if pushed with the alt-key down, align to the right printer margin).
- Align top (if pushed with the alt-key down, align to the top printer margin).
- Align bottom (if pushed with the alt-key down, align to the bottom printer margin).
- Distribute Horizontally (if pushed with the alt-key down, distribute vertically).
- Center in Printable Area
- Nesting:
 pack spaces to optimize paper usage.
Tip: When pushed with the alt-key pressed the nesting will be performed without dialog, according to the current nesting preferences. See nesting instructions.
- Trimming:
 trim the unused paper around the selected object or all abjects (according to your answer in the appearing dialog).
Tip: Hold on the alt key while clicking this tool to avoid the dialog. A trim around all objects will be performed.
- Crop spaces dialog:
 allows to change each side crop space individually an all selected images at once.
- Rotation:


A selected object can be rotated with the above push buttons. Each click rotates +/- 90 degrees.Tip: While holding the alt key, each click gives +/-45 degrees rotation.
To obtain free rotation use the info panel or the editing manual mode.
- Flip:

 flip selected images horizontally / vertically
- Lock:

 lock / unlock (while alt key is pressed) selected objects
- Delete:
 delete selected objects
Specialized tasks
Here's a series of more specialized tasks somebody may find useful, somebody may not.
You can discover FitPlot versatility in the overview section where use of these specialized commands is explained with "real" examples.
Either you can explore each command dialog clicking on the links below (where available).
 Info Panel
This panel is the most important instrument to get and set important values of a selected object. Here you can set an object position, rotation, scale and many other properties, with numerical precision.
 Items List Panel
This panel is the last born of the app, it is intended to imediately show the "cast" of the FitPlot document. It shows the list of all objects in the document in order of stack. You can see a small icon, the file name, the file path and you can perform some operation (selection, locking, relink).
 Color Management Panel
In this panel you can set up the color flow chain for bitmap images, starting from their embedded profile (or assigned, in case the first one is not available), and through appropriate conversions, landing to the best profile suitable for the pair printer / media, including a proper monitor representation (softproof). [Read the note below]
 Image Adjust Panel
Raster images can be adjusted directly inside FitPlot. Note that the original image is not affected by this adjustment.
 Log Browser Panel
Here you can look the historical list (log) of all printings performed by FitPlot. Various parameter are recorded at each printing and they may be useful for statistics or counting.
Related with the log records there is the printers control panel
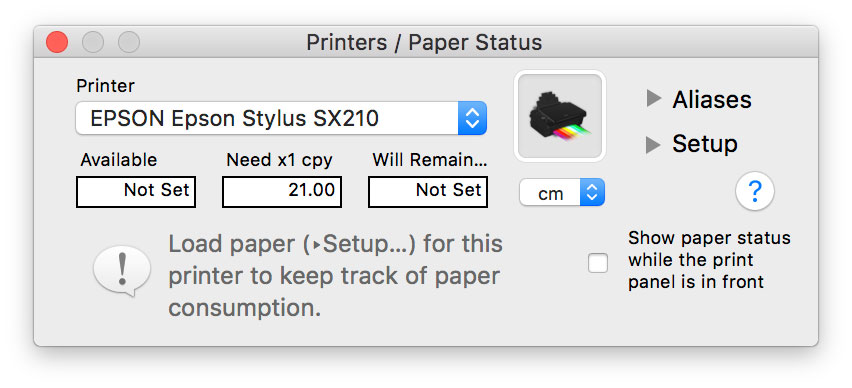
Here you can set some behavior you want to have from each of your printers.
For example it is possible to be warned that a plotter roll is about to finish and we want to know it before the print is sent.
This can be possible both for a single user and a whole office, just choosing to record the log in a folder shared on the network with other FitPlot user (and they have to do the same).
In this way, statistics and paper consumption are extended to all users and result more consistent and reliable. More infos in the Log section.
 ICD (ink coverage density)
With the ICD tool it is possible to estimate the range of ink coverage in the printing page and consequently evaluate the effective cost of a print.
You can activate an ICD interrogation by menuView -> Ink Coverage Density [⇧⌘I], or by using the ICD button in the toolbar (if it is not there, you can add it personalizing the toolbar, see top of this page to know how).
 Insert Image/s
You usually insert images in a FitPlot document dropping them onto the page. The "official way" is the Insert command, where you browse the disk in search of the image/s to insert. Note that you can select one or more image files or even a folder containing images. In such multiple insertions you can take advantage of the automatic transformation (see insertion preferences for automatic images transformation while inserting).
-

 Simple and Serial Duplications
With the simple duplication a copy of the selection is created.
With the serial duplication, as the name suggests, it is easy to make multiple reproductions of an image. If the image is multipage (tiff or pdf may be), you can optionally increase the page number at each reproduction.
 Transform more objects
This powerful tool allows any modification in a set of selected images. From size to styles, any aspect can be modified in a sole operation applied to many images.
-
 Change from a scale to another
With this tool is easy to change a drawing scale from one to another; it is also possible to set a scale to a drawing of unknown scale (if a quote is present on it) with a simple guided procedure.
- Nesting
This is one of the most valuable tools in FitPlot. The algorithm let you choose between three ways of arranging images in the available spaces:
- disposing images in a single sheet of variable size.
- disposing images in one or more pages of fixed size
- disposing images in a user defined area
To facilitate the task, some menus has been prepared (with relative keyboard shortcuts) to perform the more common nesting operations without the need to open the command dialog.
This tool is under continue study and will be better and better in future releases (I hope!).
 Contact sheet
This command is useful whenever you need a quick layout of a series of pictures that you want to print on a contact sheet.
Images will be ordered, along with the choices you made in the control dialog, in rows and columns, in the needed number of pages.
To facilitate the task, some menus has been prepared (with relative keyboard shortcuts) to perform the more common contact sheet dispositions without the need to open the command dialog.
- Trimming
Trimming is a nesting "shortcut". When you have just one image to print and you want to use the minimum paper size, this is the button to click.
 Expand PDF tool
suitable for multipage PDFs, in just one click, generates all needed FitPlot document pages (in one column) and add each one the relative PDF page.
Expand PDF tool
suitable for multipage PDFs, in just one click, generates all needed FitPlot document pages (in one column) and add each one the relative PDF page.
 Pagination
With pagination you can set the number of pages of a FitPlot document. The pages are, in FitPlot, disposed as matrices (columns or horizontal pages, and rows or vertical pages). The pages are aligned in columns and rows in contiguity (though they can have overlapped areas). This way admits the printing of big images divided in single pages matrices, or even real 1:1 printing of architectural drawings, divided in large strips exploiting the maximal width of a plotter.
 Imposition
[taken from Wikipedia] Imposition is one of the fundamental steps in the prepress printing process. It consists in the arrangement of the printed product’s pages on the printer’s sheet, in order to obtain faster printing, simplified binding and less waste of paper.
That said, experts will find all they need in the imposition dialog.
 Business Cards Imposition
This feature allows to produce a quick and correct imposition of a medium / large number of business cards. There are some simple prerequisites to follow (such as naming conventions e.g.), but once you get it, the business card prepress composition will be easy and, most of all, error free.
 Fotoba® DIGITRIM marks
With the command Trim signs control… it is possible to take advantage of the optical reading markers to be used in the cutters Fotoba® model DIGITRIM.
 Bleed control
The bleed is the part on the side of an image that gives the printer a small amount of space to account for movement of the paper.
This command applies to selected images. You can perform it in the menu Instruments → Bleed… [⇧⌘B] or in the (customised) toolbar
 Canvas wrap
This command "extends" image borders of a user defined amount.
The command applies to selected images and is available in the Tools → Canvas Wrap… [⇧⌘W] menu as well as in the (customised) toolbar.
Pressing the [alt ⌥] key before to choose the menu (or the tool) Canvas Wrap…, we get the immediate execution of the command using the last memorised border amount.
Images on each border are the result of the initial image reflection, clipped until the "thickness" of the user defined value is obtained.- Advanced insertion
When this tool is on, according with what you decide in the preferences panel you can establish how to behave when inserting new images in the FitPlot area (ask each time, apply presets, do nothing). The settings regards resizing, constraining height or width, rotating and applying styles as well as nesting after insertion.
 Image Capture
Using this tool you can capture a portion of the screen or the entire content of a window (press space bar and select the window). The captured image will be inserted directly in the FitPlot document. When quitting / saving you'll be requested to save on disk the captured images.
 Import from Connected Devices…:
this command (menu or toolbar) is available when there is at least a camera device, an iPhone / iPad, a smart card attached to the computer.
It opens a panel where you can see the devices on the left, and, opening each device, the pictures that it contains. Select one or more picture and click the download button to place the images on FitPlot. You'll be asked also to save them on the disk.
 Acquire from Scanner…:
this command (menu or toolbar) is available when there is at least scanner attached to the computer.
It opens a panel where you can capture images placed on the scanner bed. Images from scanners are saved in the temporary folder (in FitPlot sandboxed area). You'll be asked to save them to disk when quitting/closing.
- Revert Stack Order… Menu:
You can find this menu in [Tools->Arrange] or as a contextual menu in the items list panel.
The usage of this command is well explained at this relevant page. In summary you can find it useful in creating ordered layouts (with the nesting / packing function) of folders of images.
- Resize to Photo Standard Sizes Menu:
these menus are available under the Tool menu or as contextual menu [right click on image].
The command constraints selected images to a size of your choice taken from standard international sizes (as from wikipedia table, see a copy below).
See here below (New Image Relink Options) for Fit / Fill behaviors; See at the bottom of this page the table of the most common used sizes in photography printing.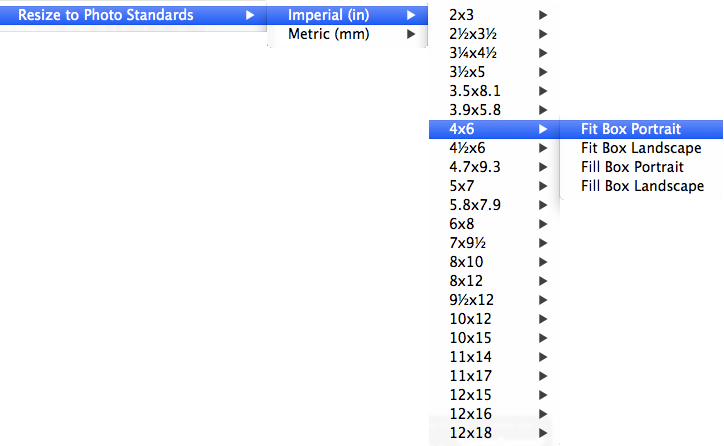
- Image substitution: relinked images constraints [preferences panel]
It's easy to substitute one of more copies of the same image clicking on the [change] button in the info panel or double clicking the image itself.
Since 5.5 version we have 3 options when replacing an image with another.
These options are:
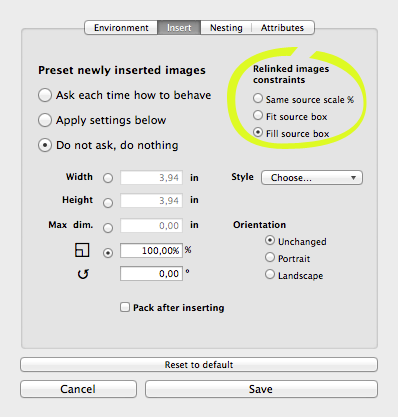
- Same source scale %: this is the old behavior, the replacing image assume the scale % of the source.
- Fit source box: in this case the replacing image is scaled to match opportunely one side of the box, centering the image in the box and leaving blank the exceeding spaces.
- Fill source box: with this option, the box is entirely filled by the replacing image, scaling it opportunely and cropping the exceeding part to maintain the source ratio.
Export operations
-
 Export as PDF: this command save the current document in a PDF (vectorial) file, with all the pages. This command is available also in the File menu.
 -
 Export to bitmap: this command let's you save just the currently showed page in a raster file. PNG, TIF, JPG, raster PDF and others formats are available, with relative options, in the save dialog. Also this command is available in the File menu.
 -
 Export Single Image: with this command it is possible to export the [super]selected image, saving it as TIF. The saved image will reflect both the current image adjust settings (brightness, saturation, contrast, exposure, tinte, CLUT effect) and the color space currently in use (according to settings in the color management panel).
-
4.
 Export as TIF 16bit@300dpi…
This command (menu or toolbar) exports the current FitPlot document page in a tiff file. The saved file will have a depth of 16 bit at 300 dpi and will have the color profile chosen in the export dialog.
This feature has been temporarily introduced to meet expectations of professional users that prefer to manage the color flow control with other softwares, but want to maintain the power and flexibility that FitPlot gives composing the layout.
We are working for a better implementation in next coming releases.
The menu will show a dialog where we can choose work and destination profiles (to apply to all images), with relatives rendering intents.

The [File->Export as TIF 16bit@300dpi…] save dialog
Table of some common sizes*
[*] Excerpt from Wikipedia
| Japan | Size (in.) | Size (mm) | Pixels at 300 PPI | Aspect ratio | Note | |
|---|---|---|---|---|---|---|
| 2 × 3 | 51 × 76 | 600 × 900 | 3:2 (1.5) | Very often called "wallet" size. | ||
| 2R | 2½ × 3½ | 63.5 × 89 | 750 × 1050 | 7:5 (1.4) | Older standard for "wallet" size. | |
| E | 3¼ × 4½ | 82.5 × 120 | 974 × 1417 | 16:11 (1.45) | Size in inches is approximate | |
| 3R | L | 3½ × 5 | 89 × 127 | 1050 × 1500 | 10:7 (1.43) | Called "9 × 13 cm" worldwide. |
| 3.5 × 8.1 | 90 × 205 | Chou #4 envelope size | ||||
| PC | 3.9 × 5.8 | 100 × 148 | Hagaki postcard size | |||
| 4R | KG | 4 × 6 | 102 × 152 | 1200 × 1800 | 3:2 (1.5) | Standard & print size in US, Canada, Australia and India. Called "10 × 15 cm" worldwide. |
| 4D | 4½ × 6 | 114 × 152 | 1350 × 1800 | 4:3 (1.33) | New size for most consumer level digital cameras and Micro 4/3 cameras. Also known as "6D". | |
| 4.7 × 9.3 | 120 × 235 | Chou #3 envelope size | ||||
| 5R | 2L | 5 × 7 | 127 × 178 | 1500 × 2100 | 7:5 (1.4) | Twice the size of a 3R print. Called "13 × 18 cm" worldwide. |
| 5.8 × 7.9 | 148 × 200 | Ofuku Hagaki postcard size | ||||
| 6R | 8P | 6 × 8 | 152 × 203 | 1800 × 2400 | 4:3 (1.33) | Twice the size of a 4R print. Called "15 × 20 cm" worldwide. |
| 7 × 9½ | 178 × 240 | 19:14 (1.36) | For B&W paper. Commonly called “18 × 24 cm”. | |||
| 8R | 6P | 8 × 10 | 203 × 254 | 2400 × 3000 | 5:4 (1.25) | Can be used for contact prints from 8×10 film. Called "20 × 25 cm" worldwide. |
| S8R | 6PW | 8 × 12 | 203 × 305 | 2400 × 3600 | 3:2 (1.5) | Closest approximation to A4 (210×297mm), twice the size of a 6R print. Called "20 × 30 cm" worldwide. |
| 9½ × 12 | 240 × 305 | 24:19 (1.26) | For B&W paper. Commonly called “24 × 30 cm”. | |||
| 10R | 4P | 10 × 12 | 254 × 305 | 3000 × 3600 | 6:5 (1.2) | |
| S10R | 4PW | 10 × 15 | 254 × 381 | 3000 × 4500 | 3:2 (1.5) | |
| 11R | 11 × 14 | 279 × 356 | 3300 × 4200 | 14:11 (1.27) | Called "28 × 36 cm" worldwide. | |
| S11R | 11 × 17 | 279 × 432 | 3300 × 5100 | 17:11 (1.55) | ||
| 12R | 12 × 15 | 305 × 381 | 3600 × 4500 | 5:4 (1.25) | ||
| 12 × 16 | 305 × 406 | 4:3 (1.33) | For B&W paper. Commonly called “30 × 40 cm”. | |||
| S12R | 12 × 18 | 305 × 457 | 3600 × 5400 | 3:2 (1.5) |